logo

  • Log In
  • Course Schedule
  • Webinars
  • FDSA Workshops
  • Pet Dog Training
  • Help!
  • Contact Us

AG375: Smoother Moves: Advancing Your Technique Training & Course Analysis

  • Overview
  • Syllabus
  • Prerequisites & Supplies
  • Sample Lecture
  • Testimonials & Reviews
    • Registration
      Apply for a scholarship

  • See Also
  • All Classes
  • All Workshops

AG375: Smoother Moves: Advancing Your Technique Training & Course Analysis


Course Details

Advanced handling techniques are often a combination of basic handling techniques and are built on the foundation of solid basics. This class will cover introducing advanced techniques and how to apply them to a variety of agility course challenges. In addition to adding new techniques to the handler’s toolbox, this class will expand on course walking strategies and course analysis. Students will work on building a handling strategy, testing it, and analyzing it so that they are better prepared for making decisions during the walkthrough in competition. Each week there will be a different theme to focus on that will enhance the handler’s knowledge and understanding of their dog’s perspective on the agility course.
This class is suitable for those teams that have a solid understanding of:

  • Commitment and Keeping Commitment
  • Basic Handling Techniques: front cross, rear cross, and blind cross

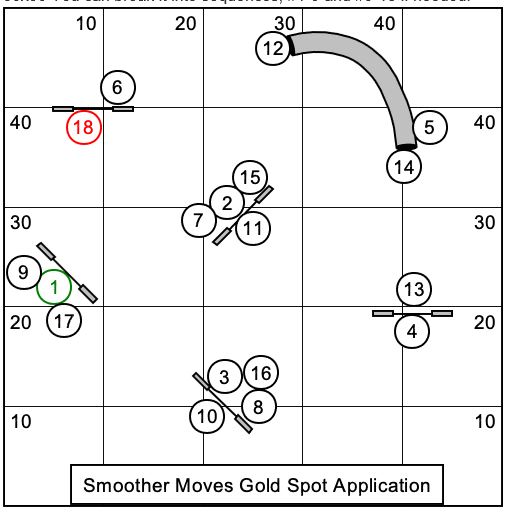
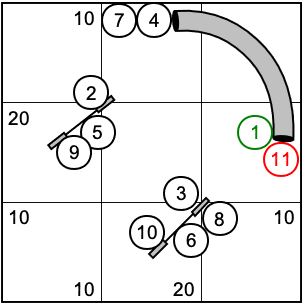
Smoother Moves will expand your handling toolbox and knowledge of course analysis. This class covers a lot of handling concepts so that each week, teams can focus on the tools that they need to be able to solve every course challenge.

I believe the perfect handling system is a solid understanding of how physical cues naturally affect the dogs plus some well-trained verbal cues sprinkled on top. The well-trained verbals are determined based on what each individual team needs. This class’s focus is built on the philosophy of handling from the dog’s perspective, with the understanding that each team is unique and will need different modifications as they progress. 

Teaching Approach

Lectures are released at the beginning of the week. There will be written and video- demonstrated instructions for each technique. Coursework will have demonstrations with voice-over analysis breaking down exactly what happened and why.

Feedback will include both written instructions and voice-over feedback on your videos.

Students are encouraged to have discussions with Megan and each other via the discussion forum and/or the FB study group about handling styles and how to individualize the communication system for each team.

Megan FosterInstructor: Megan Foster

Megan (she/her) has been involved in the dog sport world nearly her entire life. Though her family did compete in obedience, agility was Megan’s passion right from the start. With over 20 years experience, she has competed with a variety of dogs...(Click here for full bio and to view Megan's upcoming courses)

Syllabus

View Full Syllabus

Week 1:

  • 1.0 The Course from Your Dog’s Perspective
  • 1.1 Basic Technique Review
  • 1.2 Handling the Tunnel
  • 1.3 Technique Quiz: Reality Lines

Week 2:

  • 2.0 Reverse Spin Basics
  • 2.1 Reverse Spin Sequences
  • 2.2 The Power of Your Eyes: Basics
  • 2.3 The Power of Your Eyes: Sequences
  • 2.4 Technique Quiz: Turns, Turns, Turns!            

Week 3:

  • 3.0 Choosing Your Positions & Techniques
  • 3.1 Replacing the Front Cross Basics
  • 3.2 Replacing the Front Cross Sequences
  • 3.3 Wrapping Lines: Basics
  • 3.4 Wrapping Lines: Sequences
  • 3.5 Technique Quiz: Positions

Week 4:

  • 4.0 Virtual Dog Walk Through
  • 4.1 S-Lines Four Ways: Basics
  • 4.2 S-Lines Four Ways: Sequences
  • 4.3 Technique Quiz: Does Your Walk Through Match Your Run?

Week 5:

  • 5.0 Clear Round Training
  • 5.1 Technique Quiz: Clear Round Training
  • 5.2 Technique Quiz: Either-Or Training
  • 5.3 Technique Quiz: Which Way Is Fastest?

Week 6:

  • 6.0 Technique Quiz: Reality Lines #2
  • 6.1 Technique Quiz: Positions #2
  • 6.2 Technique Quiz: Does Your Walk Through Match Your Run? #2
  • 6.3 Technique Quiz: Clear Round Training #2

Prerequisites & Supplies

View all Prerequisites & Supplies

This class is the third in a series of handling classes. Previous participation (at any level) in AG365: Agility Handler Mechanics and AG400 Smooth Moves is required for a Gold Spot. As needed, throughout this class, I can refer you back to lectures in AG365 and AG400, and it will enhance your learning experience that much more!

If you did not take either of these classes, they will be available for purchase during registration. This class does stand-alone well, but is more valuable when combined with the first two classes. If you did not take either of the prerequisite classes but are interested in a gold spot, please setup, film, and submit to me your first two attempts at this course.

50x50 You can break it into sequences, #1-9 and #9-18 if needed.

Capture smoother moves 1

30x30 You can break it into sequences #1-5 and #6-11 if needed. 

 Capture smoother moves 2

AG365: https://www.fenzidogsportsacademy.com/index.php/courses/26489

AG400: https://www.fenzidogsportsacademy.com/index.php/courses/28851


Equipment: Each setup will include a map for a 30x30 space and a 50x50 space. For the small setup, you will need 1-2 jumps + 1 tunnel OR 3 jumps. For the large setup, you will need 3-5 jumps + 1 tunnel.

Appropriate Age & Skill Level of Dog: Dogs should be comfortable with jumps and tunnels. They do not have to be jumping full height, so younger dogs can participate so long as they have worked through the exercises in AG400 or have instructor approval.

Sample Lecture

More

Let’s review the techniques we know, because they will be helpful in putting together new techniques next week! Remember, techniques are like recipes: they are combinations of the handling elements, and when elements of the recipe changes, the outcome of the recipes changes too! 

Remember that your recipes may be different based on what your dog needs in each situation; hopefully the demonstration videos show that well for you! All of the demo videos will be "first attempt" demos. Real life, real humans, real dogs. :)

We'll go over the 50x50 maps first.

Course 1: Begin dog on right. Use ROTDL to cue the lead change from #2 to #3. Use a front cross for #3 so that the dog exits the tunnel on your left side. If your dog jumps long over #5, you may need to use ROTDL to cue the lead change from #6 to #7. If your dog turns tight on #5, it should be a straight line from #6 to #7, with no lead change required. Use a front cross or blind cross for #10 to send your dog into the tunnel on your right side. Which technique you choose depends on your dog's obstacle/handler focus balance. A more handler focused dog can use a blind cross here, while a higher obstacle focused dog may need a stronger turning cue (front cross). Because the dog will exit the tunnel turning to the left, and #12 is on the dog's right side, you will need to cue ROTDL as the dog exits #11 to commit your dog to #12. Use a forward send to commit your dog to #13 and a blind cross to cue the side change for #14 to finish the sequence with the dog on your left side. 
You can break this course into pieces if needed: 
1-7 and 7-15 is a nice split! 

Video: Graham & Skrik! Based on how Skrik landed #1, it was a straight line into the #3 tunnel. There was a slight lead change needed from #6 to #7, if you watch closely, you can see Skrik's head land facing slightly to her right and then change to her left to find the tunnel. Graham's blind cross for #10 is timely and makes for a nice line into the #11 tunnel. He sends Skrik really well to #13, giving himself plenty of time to blind cross and move out of her way for #14 to #15. 

Course 2: Begin with the dog on your left. Use a rear cross to cue the turn on #2. Use a backside send + a front cross to cue the wrapping line on #3. Continue #4-5-6 with dog on your left side. For the turn at #6, use a false turn (or your "threadle" handling), to guide the dog into the #7 tunnel. Remember to cue the lead change needed, and rear cross the tunnel, so that the dog exits on your right side. Use a rear cross at #8 to cue the turn to the right. Use a backside send + a front cross for #9 to finish the sequence with the dog on your right side. 
You can break this course into pieces if needed: 
1-5 & 5-10 is a nice split! 

Video: Bonnie & Dora! Bonnie has good connection with Dora as she exits the tunnel. Dora gives a great example of late commitment. You can see that she is watching Bonnie instead of the jump ahead, so that means that Bonnie can not cue the rear cross until Dora looks forward. Dora commits easily to the backside at #3, and Bonnie's position far from the obstacle helps for the next sequence! Dora knows the turn is coming and the new line is available to her as she lands. After Dora's correction stride on #5, she is looking at Bonnie and Bonnie is already giving the false turn cue (chest turned towards Dora's line and the non-dog-side arm is up). This causes Dora to pass #6. In order to keep the flow, Bonnie circles around, taking Dora back over #4 and #5 to reattempt the turn for #6. Dora lands #5 looking at #6 and Bonnie is able to guide her into the #7 tunnel, supporting the lead change with her chest and opposite arm. Dora commits much earlier to #8 - Bonnie could have started moving across her line sooner, at around :21. This does put Bonnie slightly behind for the final front cross, but was able to begin rotating enough before Dora takes off to let her know about the turn. 

Now, the 30x30 courses! If you are using the purple jump instead of the tunnel, the number is on the side of the jump I'd like you to take. 

Set 1: Light Circles: there is no side change needed 
Dark Circles: you will run the dark circles two times. Once, with a false turn (or "threadle" handling) to cue the turn from #2 to #3. and Once, with a front cross to cue the turn from #2 to #3. 

Video: Megan & Shock! I am rehabbing my foot from some tendonitis, so I am not allowed to run! I am wearing crocs because that's the only shoe that feels good AND it pretty much keeps me from any hard running. I am using a pre-placed reward to proof our handling in this setup. Shock easily keeps lines for the first sequence. I sped up the toy play but wanted to leave as much of the training session in there. The next toy placement serves as a distraction for following the turn at #2. Shock makes an error and does not react to my false turn and takes the toy anyway. I cue her to "spit" which is her out the toy cue. I wish I had rewarded that quick "spit", so that she had gotten something out of that rep. I view the toy distraction on the line as her favorite off-course obstacle, so when we are competing I know how much I need to do to keep her on course. The next rep, I turn my chest away from the trap a lot more, and I use her name until I see her look away from the toy. Next is the front cross. She cracks me up! She did follow the handling, but she picked up a prize on the way! So I rewarded her. On the next rep, I use her name before take-off for #2 as a reminder to pay attention to me vs her toy. Dog on right went much more smoothly, because I was prepared for what she needed. For the false turn, I turned to face her more and used her name until she looked to the correct line. For the front cross, I used her name before take-off for #2 as a reminder to pay attention to my body vs the toy. 

Set 2: You will start on the inside of the tunnel. Use a forward send and turn with your dog to cue the turn from #2 to #3. The higher the obstacle focus, the stronger the decel cue you will need. Use a rear cross to cue the turn from #4 to #5, and finish on the inside of the tunnel at #6. 

Video: Megan & Shock! This video begins with some virtual dog work, just to make sure I've got it. For the forward send, I make sure to stop my forward motion quickly and begin moving away from #2 to clear the line for Shock to the tunnel. I am patient while she tunnels so that I am not too far ahead for the rear cross. Shock commits to # 4 easily and I am able to cross her line before takeoff. Next, you'll see me "drawing" the course with my finger, making sure I've got it in my head.  This side looks very similar to the first rep. The only difference being how I turned when Shock went into the tunnel #3: the first side, I turned with her, cueing more extension out of the tunnel. The second time, I turned against her (a technique you'll learn about next week). This naturally cues more collection on the exit of the tunnel. It was not intentional at the time, but something I need to be aware of and use consistently throughout a dog's career. 

Set 3: Start on the inside of the tunnel. Use a backside send + blind cross for #3 to send your dog into the tunnel. Front cross the tunnel. Use a backside send + ROTDL to cue the slight turn from #6 to #7. 

Video: Megan & Shock! A little virtual dog demo to start you off. Can you visualize where Shock is anytime you press pause? Because Shock keeps lines so well, as long as I support the line between #2 and #3, the backside feels more like cueing a "pinwheel" type of line. This allows me to turn my head for the blind cross before she's behind the wing (:23), giving me plenty of time to move out of her way on the landing side. A front cross for the tunnel just before she enters shows her the correct exit line to get to #5. Then, notice a tiny bit of patience on my part before I begin moving towards #6. Because her line over #5 is taking Shock away from #6, I need to wait for her to land and see #6 before I can commit her to it. Because of my position close to her line and my chest laser turned towards her with my opposite arm in front, Shock lands #6 already turning slightly to the right to get into the tunnel. Next, for beginning dog on left, my blind cross on #3 is just a bit later, but still in "ok" time. I momentarily forget what's next, but just barely got out Shock's way before she exited the tunnel (real life, real humans, real dogs, remember...)! I was again a little bit late with the cue for #6, but my motion paired with Shock's experience told her what was next.

Assignment

Show me EITHER Course 1 & 2 OR Set 1 & 2 & 3 - you do not have to do both! My preference will always be for your first attempt + whatever training adjustments (based on lecture 1.0) you needed to do: handling the "mistakes" or using reward placement to encourage good obstacle/handler focus balance. 


Testimonials & Reviews

Read All Testimonials

A sampling of what prior students have said about this course ...

New class for the February 2021 session.

Registration

Next session starts: February 1, 2021
Registration starts: January 22, 2021
Registration ends: February 15, 2021

Registration opens at 9:30am Pacific Time.


AG375 Subscriptions


Gold

Silver

Bronze
Tuition $ 260.00 $ 130.00 $ 65.00
Enrollment Limits 10 15 Unlimited
Access all course lectures and materials ✔ ✔ ✔
Access to discussion and homework forums ✔ ✔ ✔
Read all posted questions and answers ✔ ✔ ✔
Watch all posted videos ✔ ✔ ✔
Post general questions to Discussion forum ✔ ✔ ✖
Submit written assignments ✔ ✖ ✖
Post dog specific questions ✔ With video only ✖
Post videos ✔ Up to 2 ✖
Receive instructor feedback on
  • Questions
  • All videos
  • Questions
  • All videos
✖

Find more details, refund policies and answers to common questions in the Help center.

  • Prev
  • Next
  • FDSA
    • About Us
    • What Do We Teach?
    • Faculty & Staff
    • Testimonials
    • Privacy Policy
  • Student Resources
    • Calendar
    • Scholarships
    • Gift Certificates
    • Swag
    • Trainer Certificates
  • Courses
    • Class Schedules
    • By Instructor
    • By Discipline
    • Prerequisites
    • Self Study
  • Webinars
    • Schedule
    • Webinar Courses
    • Register
  • More Learning
    • Podcast
    • Blog
    • Training Camp
    • Puppy Book
    • Private Lessons
    • TEAM
  • Help!
    • Getting Started
    • Enrolled Students
    • Video & Images
    • Webinars

Copyright © Fenzi Dog Sports Academy and individual instructors.

Technical support - send email to help@fenziacademy.com

Connect with us!