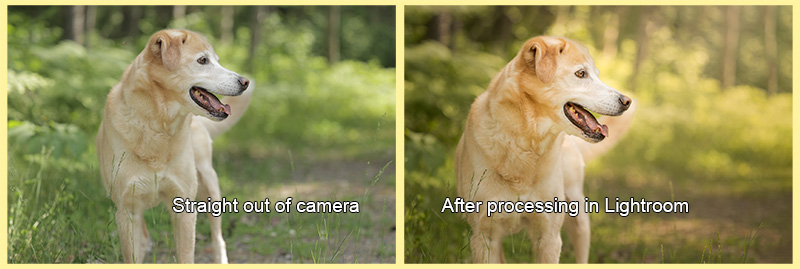
logo

  • Log In
  • About Us
  • Calendar
  • Faculty & Staff
  • Training Camp
  • instagram-icon
  • facebook-icon
  • twitter-icon
  • Courses
    • Schedule
    • By Discipline
    • By Instructor
    • Prerequisites
    • Self-Study
    • Scholarships
    • Gift Certificates
  • Webinars
    • Schedule
    • FAQ
  • Workshops
    • Schedule
    • FAQ
    • Gift Certificates
  • On Demand
    • Pet Dog Presentations
    • Pet Professionals Presentations
    • Self-Study Courses
  • Special Links
    • Podcast
    • Blog
    • Fenzi TEAM Titles
    • Trainer Certificates
    • Private Lessons
    • Other Free Stuff!
    • Swag
  • Events
    • FDSA Training Camp - Albany Oregon Oct 6-8, 2023
    • Bootcamps
  • Contact
    • Course FAQ
    • Webinar FAQ
    • Workshop FAQ
    • Testimonials
    • Contact Help

FE650: Adjust the Dog - Introduction to Lightroom

  • Overview
  • Syllabus
  • Prerequisites & Supplies
  • Sample Lecture
  • Testimonials & Reviews
    • Registration
      Apply for a scholarship

  • See Also
  • All Classes
  • All Workshops

FE650: Adjust the Dog - Introduction to Lightroom


Course Details

This course is designed to introduce the basics of post-processing.  The software we will use is Adobe Lightroom Classic, but it is also possible to use Adobe Photoshop Bridge instead.  Post-production work will emphasize enhancing our images, not "fixing" them.  However, the skills you learn in class will allow you to fix your photos if you don't get it exactly right in the camera.  

We will be using Lightroom Classic.  You may use other photo editing software, but the instructor will be able to provide detailed technical support for only Lightroom (and equivalent processes in Photoshop).  

Expect 2 assignments per week, plus additional submissions with revisions to your images based on instructor feedback.  

Completion of Shoot the Dog and/or Expose the Dog is strongly recommended.  You may sign up for a Gold level spot if you have not completed Shoot the Dog and/or Expose the Dog, BUT knowledge and a mastery of the basic photography skills from those classes will be assumed.  This includes, but is not limited to, a strong understanding of and ability to use manual exposure mode to reliably take properly exposed photos.  If you do not use manual exposure for most of your photography, this class will not be a good fit for you.

Computer skills required to be successful in this class:
  • Strong level of comfort with computers in general
  • Understand the directory structure of your hard drive (where image files are located)
  • Where to find files downloaded from a web browser
  • How to upload photos to Google Photos album
  • Create screenshots and upload them to a Google Photos album

Please see the Equipment requirements for this class in the "Prerequisties & Supplies" section below.

If you want to get started in Lightroom before the class begins (and I recommend that you do!), there are a TON of online resources to introduce you to the basics, many of them free.  

If you need a good quick start for Lightroom, you can get one at "The Lightroom Queen" by signing up for their mailing list.  

http://www.lightroomqueen.com/quickstart/

If you don't want to stay on the mailing list, just sign up, get the free ebook, and then unsubscribe right away.  I have an email address that is only used for things like this so that it doesn't clutter up my main inbox.  You could sign up for a Gmail account that you would then use exclusively for mailing lists and other things related to photography, including this class.  


Teaching Approach

Lectures are released twice a week, along with a corresponding assignment that follows the lecture material. Students will submit homework for each assignment, as well as additional submissions with revisions to your images based on instructor feedback.  

Some assignments include step-by-step instructions to follow to demonstrate that the student understands a skill. Some are more open-ended, leaving more of the choices for the student to make in how they complete the assignment.

Lectures are primarily written, with supplementary videos from a variety of sources on YouTube.  Some videos may have subtitles, but it varies depending on the source.


Amy JohnsonInstructor: Amy Johnson

Amy Johnson (she/her) is the official show photographer for many of the premier agility events in the United States, including the AKC National Agility Championships, AKC Agility Invitational, USDAA Cynosport World Games, UKI US Open, and NADAC Championships, as well as numerous local trials, regional events, and breed national specialties.  She has photographed a wide variety of dog sports, including agility, obedience, rally, and conformation.  (Click here for full bio and to view Amy's upcoming courses.)

Syllabus

View Full Syllabus

As with all my classes, the syllabus is sketchy and somewhat fluid.  This is a very broad overview of the topics we will cover and approximately when they will fall within the course.

Week 1:
Orientation
Workflow

Week 2: 
Review of Histograms
Basic Controls

Week 3:
Lens Profile Corrections
Crop Tool

Week 4:
Masking

Week 5:
Intro to Noise Reduction and Sharpening with Topaz plug-ins

Week 6:
Final Project

Prerequisites & Supplies

View all Prerequisites & Supplies
Course Prerequisites - none, with the following caveat:
You may sign up for a Gold level spot if you have not completed Shoot the Dog and Expose the Dog, BUT knowledge and a mastery of the basic photography skills from those classes will be assumed.  This includes, but is not limited to, a strong understanding of and ability to use manual exposure mode to reliably take properly exposed photos. If you do not use manual exposure for most of your photography, this class will not be a good fit for you.
 
Equipment required for Gold students:
  • DSLR camera, lens, memory card(s)
  • Preferred for Gold - Computer (Mac or PC) running the latest version of Lightroom Classic.  This is obtained via a subscription to Adobe Creative Cloud (see below).
  • Acceptable for Gold - Older versions of Lightroom will have most of the functionality that is required for the class.  However, most instructions will be given based on the latest version.
  • Preferred for Bronze - Current version of Lightroom Classic.
  • Acceptable for Bronze - Older versions of Lightroom.
Other Required Equipment
 
MONITOR CALIBRATION:
You need to calibrate your laptop or desktop computer monitor to get the best and most consisitent color and brightness results from your post-processing.  If your monitor is not calibrated, neither one of us can be confident that the photo looks the same on your screen as it does on mine.  This is required equipment for all GOLD students.
 
Please do not wait until class starts to order the calibration hardware.  It is not just software, it requires an actual physical piece of equipment that you may need to have shipped to you.  Order it as soon as possible and once it arrives, please calibrate your monitor. If you have problems, there will be a thread in the class forums that I will check before class starts.  Post in that thread and I'll help you get unstuck.  
 

I recommend the Calibrite ColorChecker Display:

https://amzn.to/325tLJY


This is a piece of equipment you'll buy once.  I've been using the same one for years.  There are others out there, but this is the one I am familiar with and I trust the results.  

One other thing to be aware of is that the quality of your monitor will also have an impact on how your images look.  If you're working with an old monitor or laptop, it is probably not going to show you the full range of brights and darks that a newer monitor will.  (If you didn't think photography was a money pit before, you will now.  ;-) )


LIGHTROOM SUBSCRIPTION:

You can sign up for a subscription to Adobe's Creative Cloud software here:

https://creative.adobe.com/plans?store_code=en&promoid=KSDPZ

Select the "Photography" plan for $10/month.  This will give you both Photoshop and Lightroom Classic.

Bronze students can follow along with the class with either Photoshop/Lightroom or Photoshop Elements, as long as they understand not all of the features will be available in Elements or older version of Lightroom/Photoshop.

 
Computer skills required to be successful in this class:
  • Strong level of comfort with computers in general
  • Understand the directory structure of your hard drive (where image files are located)
  • Where to find files downloaded from a web browser
  • How to upload photos to Google Photos album
  • Create screenshots and upload them to a Google Photos album


Sample Lecture

More
This class uses a combination of written lectures, curated videos from other sources, and screenshare videos produced by Amy.
 
The following video is an example of a screenshare created during Adjust the Dog.  
 
 
The following written lecture is from mid-way through the class.  
 
Now that you’ve gotten your fingers into LR and have a feel for the basics, let’s start putting some order to the chaos that I’m sure you’re all feeling about now.  The good thing is that you probably have a pretty good idea of the places you’re getting stuck, so this will should be more helpful than if we had started our LR journey here.  My hope is that it starts to close some of the gaps in your skills.  
 
Our definition of a “Finished Image” will change as the course progresses, but even if you don’t get any farther than understanding the Basic panel and the Crop panel in your post-processing techniques, you will have all of the tools you need to capably process most images you deem worthy of keeping.  
 
I’m going to walk you through processing one of my own images.  I want you to be able to follow along, so I’ll give you links to download the RAW file.  But first, I want to talk through how I approach the process.  
 
Let’s look at where to start.  First of all, we want an image with a “good data.”  What determines if we’ve got good data?  A good histogram.
 
  • What does the shape of the histogram tell you about the overall look of the image?
  • Is the image over-exposed or under-exposed?
  • Is there any clipping in the highlights or the shadows?
 
Regarding clipping, there might be a little clipping on one end or the other, but it should be in places that are not critical to the actual subject.  If you’ve clipped a large area of your subject, it’s not an image with good data and should end up in the reject pile.
 
If we’ve established that our file has good data, then we start looking at the details within the image itself.
 
  • How does the color look?  If it looks off, what specific color(s) are off?  
  • What parts of the image look too bright?
  • What parts of the image look too dark?  
  • What parts of the image are distracting?
  • Is the overall image too bright or too dark?
  • Is the composition balanced or do we need to crop?
 
This may feel very pedantic, but taking the time to think through your plan for the image will provide structure and order to what can otherwise be a very random process.  
 
We’ll call this the Pre-Processing Analysis.  These are the questions you need to answer before you start to move a single slider.  Now let’s apply it to an image.
 
Image - Chestnut-sided Warbler
 
Download the RAW file from here:
https://www.dropbox.com/s/esr20m8cgz6sbmr/2016_05_23_AEGJ4622.CR2?dl=0
 
Note: This file is from a Canon 1DX Mark II camera.  It is a new camera model and requires that your version of LR be up-to-date in order to read it.  If LR cannot read the file, go to Help --> Updates to get the latest version of your copy of LR. You should not have to upgrade to a new version of LR, just update the version you already have.
 
We will start with our Pre-Processing Analysis.
 
Let’s take a moment and compare our reaction to this photo with the histogram.  If you ONLY saw the photo and NOT the histogram, what would you think about this image?  I’m hoping that all of you would say it’s overexposed.
 
Screenshot 2016-06-16 20.01.18
 
Now take a look at the histogram and what do you think?  It’s bright, that’s for sure, but is it actually overexposed?  
 
Screenshot 2016-06-16 20.01.30 
 
Well, the answer is it depends.  If you want to post an image like this straight out of the camera, then it's a little bright.  However, if you want to bring it into LR and polish and refine it, then no, it's not overexposed.  It's perfectly exposed.  It has good data.
 
The most important thing to notice in the histogram is that there are no clipped shadows or highlights.  Don’t believe me?  There is a tool in LR to show you exactly what parts of the image are being clipped.  If you press the “j” on your keyboard, you will see red areas show up where there is highlight clipping, as blue areas show up where there is shadow clipping.  Go ahead and test out this image.  
 
If I deliberately cause clipped shadows (drag Black slider to -100), this is what the image would look like:
 
Screenshot 2016-06-16 20.04.51
 
If I deliberately clip the highlights (drag White slider to +100), this is what you would see:
 
Screenshot 2016-06-16 20.05.59
 
I usually like to start with the White Balance, but the colors are so washed out that I’m not confident enough in them to make adjustments when it looks like this.  This time, we’re going to make our Tone adjustments and then come back to the WB.
 
We don’t have to worry about clipping in this image, but we are going to have to tone it down quite a bit.  The way to adjust the overall brightness of the image is with the Exposure slider and that will be the first one we apply.
 
Now that we have an idea of what needs to be done, let’s get started.  
 
First the Exposure slider.  We’ll slide that one to the left until it says -1.00.
 
Screenshot 2016-06-16 20.28.28
 
That looks pretty good!  It’s still lacking a little bit of pop, but if I could only make that much adjustment, I could be happy with the way it looks.  
 
Now I can see that my WB is not quite where it should be.  The day when this was shot was overcast, plus the bird was in a little bit of shade from the trees high overhead.  This creates a very blue/green color cast to the image, even with a Cloudy WB set on the camera.  I’m going to try the LR Cloudy preset first and then tweak it if necessary.  
 
Screenshot 2016-06-16 21.46.35
 
This fixes the blue problem by bringing the Temp up to 6500, but it’s still not quite enough red.  I’m going to take the Tint up to +18.
 
Screenshot 2016-06-16 20.33.11
 
That’s much better.  The additional red brings out the chestnut color in this Chestnut-sided Warbler.
 
Now it’s still looking flat, so I’m going to add some Contrast (+20) and just a little bit of Clarity (+10).
 
Clarity is one of those things that needs to be applied very carefully and can easily be applied with a heavy hand.  
 
Here is how our Basic panel looks after our adjustments.  This image was well exposed and doesn't need any of the other basic settings adjusted.  
 
Screenshot 2016-06-16 21.55.21 
 
That looks good to me.  Now for the cropping.  
 
Warblers are very little birds and they do not like to come too close to humans.  This image was shot with a 400mm lens plus a 1.4x extender, for an effective focal length of 560.  Even with that long of a lens, I still could only manage a shot where the bird was a teeny, tiny part of the frame.
 
This is not the type of image that gets cropped so the bird fills the frame.  This shot will retain its quality by cropping it as a “habitat” shot, showing where the bird lives, as well as the bird itself.  
 
Screenshot 2016-06-16 21.11.26
 
Here is how I chose to crop the image.  You should be able to see that I used the Diagonal Crop Overlay to guide me with the placement of the bird.  Rule of Thirds is fine, but it’s only one way to organize your image.  The Crop Overlays in LR (that you learned about in the first video tutorial about the Crop Tool) are really nice to have when you’re looking for help deciding where to place your subject.  
 
This is my final image.  Hopefully you were following along with the file open on your own computer and it looks the same.  
 
2016 05 23 AEGJ4622


Testimonials & Reviews

Read All Testimonials

A sampling of what prior students have said about this course ...

Not only does she appear to care about the success of her students, but Amy was able to guide and encourage students of vastly different proficiency levels. She never played favorites, and offered her critiques in the most positive ways.           


Amy is the BEST!!!             


Class materials were excellent. The lectures were clear and concise, and were timed well. The curated videos were a huge bonus - each one presented contributed to the subject matter.            


Even though I took Adjust the Dog at bronze level, I worked through all my own labs AND all the other students' labs. Your comments, critiques, and guidance were beautifully suited to each person's proficiency level, and we all came out of class with many more skills and much more understanding than we started with. I'm looking forward to my next classes with you. 


I am addicted to Amy's classes!

Registration

Next session starts: February 1, 2024
Registration starts: January 22, 2024
Registration ends: February 15, 2024

Registration opens at  10:30am Pacific Time.

FE650 Subscriptions


Gold

Bronze
Tuition $ 260.00 $ 65.00
Enrollment Limits 15 Unlimited
Access all course lectures and materials ✔ ✔
Access to discussion and homework forums ✔ ✔
Read all posted questions and answers ✔ ✔
Watch all posted videos ✔ ✔
Post general questions to Discussion forum ✔ ✖
Submit written assignments ✔ ✖
Post dog specific questions ✔ ✖
Post videos ✔ ✖
Receive instructor feedback on
  • Questions
  • All videos
✖

Find more details, refund policies and answers to common questions in the Help center.

  • Prev
  • Next
  • FDSA
    • About Us
    • What Do We Teach?
    • Faculty & Staff
    • Testimonials
    • Privacy Policy
  • Student Resources
    • Calendar
    • Scholarships
    • Gift Certificates
    • Swag
    • Trainer Certificates
  • Courses
    • Class Schedules
    • By Instructor
    • By Discipline
    • Prerequisites
    • Self Study
  • Webinars
    • Schedule
    • Webinar Courses
    • Register
  • More Learning
    • Podcast
    • Blog
    • Puppy Book
    • Private Lessons
    • Team
  • Help!
    • Getting Started
    • Enrolled Students
    • Video & Images
    • Webinars

Copyright © Fenzi Dog Sports Academy and individual instructors.

Technical support - send email to help@fenziacademy.com

Connect with us! facebook-icon email-icon instagram-icon