Do you feel stuck in knowing what to train next in obedience? Or maybe even a bit lost and overwhelmed with trying to figure out how the foundations you're teaching start to fit into the final exercises? It's hard to know what the skills lead to and open/utility exercises often look intimidating to even experienced trainers!
Stop spinning your wheels while you train the same things over and over again. No more drills without actually progressing your skills.
TEAM 3 is where the real fun begins as we start to chain together the little pieces! Insert the fun back into your training!
While the skills in this class are focused on TEAM3, they are foundation behaviors that will give you an excellent preparation for any obedience organization such as AKC, CKC, or FCI obedience.
Fronts from different angles?! Sidesteps in heel? Position changes at a distance?! Marking, go outs, and directed sends?!
SO many fun skills in team 3! If you're looking at prepping for utility, there's a ton of crossover!
You do not need to have taken the team1 and team2 classes, however take a look at the prerequisites to make sure you have the background skills needed to start.
Teaching Approach
ALL Lectures are released at the start of day #1 so that working teams will have the choice of which exercises they want to focus on over the 6 weeks.
The lectures are broken down by each skill, often in multiple parts. I have written objectives and then written instructions for each step followed by multiple video examples for each step. The videos are usually between 30sec to 2min long and are taken from training sessions of a variety of dogs. I do not usually talk to the camera or use voiceover in the videos. At the end of each lecture is a homework summary with the steps quickly summarized in order.
Some videos will depict training being done with the handler sitting on the ground. These steps can be modified to be sitting in a chair, and may also be modified to have the dog at a higher level such as up on a tall platform or on a bed.
Laura Waudby (she/they) trains and competes in obedience, rally, and agility. She was halfway to her OTCH with her UDX corgi, Lance, before his uexpected early retirement. She also has championship titles in USDAA and UKI. By day...(Click here for full bio and to view Laura's upcoming courses)
This is a skills based class with the goal of getting dogs started on all of the TEAM level 3 exercises. It will also further the foundations for handlers wanting to compete in AKC, CKC (and other organizations) obedience trials
Dogs will not be able to complete all of the exercises in 6 weeks. Gold teams will have the option of working on whatever skills discussed in the lectures and earlier versions of the behavior if the dog isn't quite ready for this next step.
All lectures are released at the start of the class. This is so that students can plan which exercises they want to focus on over the 6 weeks of class. It will be impossible to work on all the topics in this class, most people will focus on 3-5 topics.
- Engagement: Learning how to move with your dog in between exercises
- Reducing Rewards: Introduce your dog to the concept that rewards may be off your body and at a distance. Increase the number of behaviors before rewarding.
- Heelwork: Transitioning from awesome pivoting to side steps, and slow doodle heeling. Pieces start to be put together!
- Retrieves: Teaching deliveries to your hand and building confidence with retrieving by distractions.
- Position Changes: Adding distance and continuing to work on the dog's understanding of the behavior regardless of handler position.
- Directed Sends and Reverse Flys: Beginning to teach changes of direction when the dog is out away from you. This works on the skills needed for utility's go outs, directed jumping, and baseball glove exercises.
- Recalls to Front vs Heel: Discriminating between the 2 positions.
- Jump work: Teaching the dog to continue on to a task after taking a jump and the importance of taking the jump in both directions. (Foundation for the retrieve over the high jump!!!)
- Recalling away from distractions: Developing impulse control!
- Walking towards a distraction: Keeping focus while moving towards an expected reward and learning that a leash coming on (or off) is not a cue to disengage!
Students do not need to have passed TEAM 1 or 2 to participate in this class but should have a solid start on any of the behaviors they wish to work on.
Gold students can still work on the level they are at for TEAM 1 & 2 skills if not ready for the more advanced versions. However, we will not be discussing the beginning steps in the lectures except for the new TEAM 3 exercises. Note: the level 2 class is available in the "prerequisite" section if you need lectures on earlier steps!
General skills you'll want as a prerequisite to work towards all the exercises (remember you don't need to work on everything!):
Cone sends at a minimum of 5 feet
Send to a target at a minimum of 5 feet
Position changes with a prop and the dog in front of you
Pivoting off the perch left and right started (doesn't need to be perfect)
Jump send
Mark/look at the reward dish on cue (and default watch of handler before the look ahead cue)
And these 2 skills will have lectures copied over from my TEAM2 class so you can start at step 1!
Retrieve to hand OR hold started
Front without a prop, or understanding of how to pivot in front position on a perch
Keep in mind that you don't need ALL of these! What do you want to build on? Even dogs at advanced skill levels will likely not be able to work on all the exercises in just 6 weeks! I'll work at what level you're at
The majority of the exercises can be practiced in the space the size of a standard living room. We will be breaking down the advanced exercises so a large space is not necessary. However, with a dog close to polishing the final exercises and chaining them together, access to a space 35x15ft will allow you to practice all of the final versions of behaviors.
Equipment Needed:
2 cones or other objects your dog is used to going around
Retrieve item
1 Jump of any type
Pivot Bowl
Platforms, perches, or any other sort of targets your dog is used to sending to at a distance
Platforms, foot targets your dog is used to doing position changes on
Exercise 3-5 #1: Marking a Non-Food Target, Teaching Straight Lines
Goal:
This is one of several lectures on the TEAM 3-5 exercise, the mini utility go out! It is one of my favorite things to train! Dogs usually love all the running involved but it is still a very difficult exercise to master. Dogs have to leave their handler (hard for many!), travel in a straight line between two tempting obstacles, stay at a distance, and then be given a direction to take on their return to the handler. They then have to repeat it and again listen closely as they learn what direction was correct last time might not be correct the next time!
The TEAM exercise breaks this down to be a shorter distance send away with an obvious target, and cones instead of jumps.
In this lecture, the goals are to:
Build the dog's distance of running to a target
Teach a mark of a target without the lure of food on it
Teach the dog that the goal is a straight line, not about a specific target.
Building Distance - Using Targets
For the final test, the send away will be 20 feet. We will ease back on this distance when adding in the distractions so that the dog is working on only one difficult aspect.
You can use any target of your choice including a platform, perch, pvc box, plastic lid, or a stanchion. For most dogs a large paw target such as the platform or perch will be easiest to start with as it already has a ton of value put into it.
However, a vertical target such as a stanchion will be easiest to see at a distance and for most areas of the U.S. it will be the ultimate goal of the send away. If you go to a trial at the utility level (or open level in CDSP) your dog will need to do their "go out" to whatever ring barrier is commonly used at shows in your area. If your dog is only used to sending to a target on the ground it will be difficult to generalize that idea to a vertical surface, especially learning the concept of running straight.
This step is gradually building your distance from 5ft to 20ft. Make sure each rep is not always harder! Alternate easy and hard! 5ft-8ft-5ft-10ft-5ft-5ft-8ft....
You may want to do some fun revving up games like "ready...ready...go!" and even gently restrain them by their collar or a hand on their chest!
Note that some dogs may get stuck at a certain distance even if you're trying hard to babystep distance. If you feel like you're getting stuck at a distance, consider setting distance aside for a little while and working on the next goal of adding a mark. If the dog is looking where they are going before you send them, they are much more likely to go!!!
Adding a Mark to a Target
As you build the distance of your send it will become more important to add in your mark signal before sending the dog. Because the send away will be done without any prior context (no other reps), your dog will be better prepared to know what he is doing next and where to run to.
Just randomly cueing your dog to go touch without giving them a direction usually ends up with a confused dog who just doesn't know where to go, especially when it's in the middle of other exercises. This will become especially important as you take your training on the road and are doing go outs to locations your dog hasn't been sent before!
In TEAM2 you taught your dog this signal by having them stare at a reward (only on cue!) and to continue staring until released even when your hand was removed. The concept is the same when sending your dog to a target!
Stage 1: Mixing up Marking a Cookie to Marking an Empty Target
I like to start this with a flat target and alternate food reps with no food reps. Make sure to use a different cue of when there is food versus when there is no food! I use "cookies!" as my Zen Bowl cue and "go!" as my send to a target cue.
1. Nose/Paw a Small Target: First, ensure your dog knows how to interact with a small target. This can be a nose or a paw touch, although I find a nose touch slightly easier as their head will be lowering just like when they are going to eat a cookie off it.
2. Review Mark Cookie on Target: Do some easy reps of mark/look at a cookie on the target-release to the cookie. Walk up and give another treat on the target so the dog expects to wait out there! Then cue a few quick reps of touch the target-get a cookie on it.
Get in the habit of tossing a reset treat between reps so that the dog is coming back from the toss and coming to your side, looking at you and not looking to see if you put a treat on the target or not. You can reload the target while the dog is chasing the treat so they don't see you do so.
3. Quick Rep of Sending to Target Without the Cookie Lure: After a few reps of looking at the cookie/target and releasing to eat it, don't reload the target with the cookie. Proceed as usual with getting the dog to your side, rewarding in heel. Marking the empty target, and releasing the dog with your target cue (not reward cue) as soon as the dog looks forward. Hopefully the dog will go in expectation of there at least being a treat there!!! When they reach the target, give a marker cue and run out to place your treat on the target. Cue them to touch it again, reward, repeat a few times to brush up on that nose touch cue, just like in the previous reps.
4. Sandwich in Reps with Marking The Cookie: Go back to step 2 of doing easy cookie sends for another rep or two!
5. Try another no-cookie rep!
Here Grace demonstrates this sequence. Notice how much I also reward her for looking at me. This is not only to prevent anticipation, but to prevent her from checking out the target to see whether there is a cookie on it before I send her!
And here is Ginny's first lesson at this step.
Once the dog is getting the concept, do less of the cookie send reps and more of the blank target!!
Remember to only release your dog forward WHILE they are still staring at their target! If your dog looks somewhere else, get their focus back on you before remarking. You may need to heel a step closer to the target to help focus them.
Generalizing Your Targets
At this point, you can start to use different targets you might send the dog to. I would start with bigger targets like a platform or perch and then switch to a vertical target later on.
You may even want to put a target ON a platform to use in TEAM 3! I'm doing mainly cookie reps with Ginny here as her mark was falling apart! I really don't think she's locking in well to her target:
Here with Grace, I'm repeating the same concept as the last section. Cookies on target vs no cookies on target. I'm also prepping her for her vertical target by laying a stanchion flat before starting to get it upright. Stay close!!! Note here that Grace isn't confident! She's not only "cheating" her nose touch, but she's sometimes looking back at me when I give the mark and not fully looking forward. I try to wait until her eyeballs are actually looking at the target before sending!
And finally Ginny with the stanchion I try a slightly different approach. I put her target on the ground by the stanchion with food and send to it on "cookies", then do a few cycles of nose touching the stanchion before resetting for the next rep. After 2 reps of sending to the ground target, I do a rep where I send directly to the stanchion. It's so hard to tell if she's locking in or not! I get the impression she's doing slight avoidance when there isn't a target:
This is hard work too! Don't spend too many reps on this before doing something else, and make sure to give cookie toss breaks!!
Teaching Straight Lines, Respecting the Mark
I want my dogs to understand that the mark means to look straight ahead for a task to do. They should ignore things off to the side of their path as they run and continue on toward their final target. This concept will not only help your dog learn to ignore the jumps/cones on their way to the go out spot, but will also teach them to find the center stanchion instead of veering off to another available target.
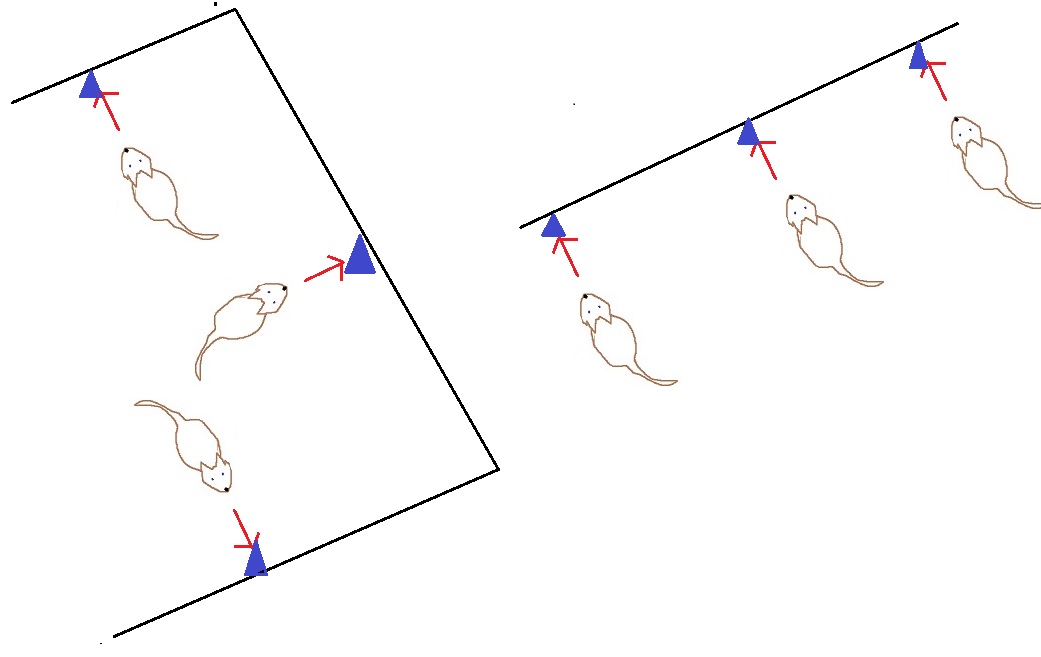
To start this I set up different targets around the room for the dog to send to. In the beginning, I keep the targets at least 90 degrees from each other, so one target can be at each side of the room. Go to whatever distance your dog needs to be successful. Do one rep. Reward. And then move to a different target.
Gradually have your targets set up on the same plane so that you are only moving laterally to send to each new target. Make sure your targets are far enough apart or you are close enough to the target that your dog is successful!
The diagram below shows the easier setup, followed by the intermediate setup.
Here Grace is learning this concept with flat targets and is back to food on them. This is to build her confidence!! I keep the distance close too! I start to alternate her "cookies" send with her "go" send (no treats). And I work hard to prevent her from going to visit another target after I send her to one! I don't want her to learn that she can visit each one to see if there are treats!
When this is easy at the 90 degree angles, you can either increase distance, or start to go to the line of targets.
Here Ash is going down the line of targets. She has food on the target she is going to send Ash to. You can see on the 2nd rep he briefly marks the wrong target so she has him look back at her to reset and try again. You want to interrupt the wrong look so that you preserve the silence=good duration work you've done with your mark training!
Ginny is working this same step with a target line, but no treats on the target. She's a bit unsure at first and thinking go out thoughts, but then she starts to do well! I don't really care that she's not touching the targets as this isn't a skill she needs
And here Zumi is working on doing a true go out to vertical targets. I send to one location and then I slide several feet (20+) to move over to a different location on the same gate. I want her going in a straight line, not just going to the same location she was last sent to. I am at a pretty big distance with her and her targets are the fence posts. The closer you are to the targets, the less distance you need to move over.
Note, this video is older than my room service marker cue! Now I use "bingo" to tell the dog to wait out there for the reward vs coming to me!
And here at a park I rotate 90 degrees to send from one fence post to another! While she is on the edge of anticipating the send, she waits nicely for my reward cue! This 90 degree rotation is easier than the video where I was going down a straight line to mark.
Homework Recap:
1. Distance: Work on the goal of building the distance your dog will send to a target to be 20ft+
2. Marking: Make sure the dog understands the mark with cookies!!! They should at minimum be able to WAIT FOR THE CUE to mark (i.e. be looking at you!), and then hold their mark for one full second before being sent. It's ok if your mark hand signal has to be held at this stage.
Transition the mark from cookies in a dish to a flat target. Alternate cookies and no cookies with different cues.
Generalize your target to whatever you want to use for the TEAM test, and/or trials (a stanchion!)
Teach the straight line and ignoring other targets. Set up more than one target. Go back to cookies, short distances, and roughly 90 degrees apart. Then move down the line with multiple targets. Always a straight line!
Continue the concept of a straight line with other tempting options!
A sampling of what prior students have said about this course...
I have now taken TEAM 1&2 and TEAM 3 at gold and my 5 yr old GSD, Hannah, and I have progressed further than we had in these two classes (two, 6 weeks sessions) than we had in the previous 3 yrs of OB training. We are new to OB and had gotten stuck in a rut with training. I could teach the initial skills, but I had a really hard time progressing them past the beginning stages and had no previous experience on how to move forward. Being able to follow the exercise progressions in the TEAM title levels has given us a clear, straight path forward that we needed. Having the instructor feedback has kept us motivated and has avoided some wrong turns that I would have taken along the path. We are not ready to pass all three of the first TEAM level titles yet, but we have a clear plan on how to get there and once we have completed them I feel like we will be so much more prepared to compete than before. Laura is really good at giving clear, kind, valuable feedback on your training videos. She is able to focus on the most important aspects of an exercise without getting caught up on extraneous, unimportant details for that team at that time. Her feedback also nurtures the handlers ability to start to be able to critique their own videos in a kind and thoughtful way. I very much enjoy Laura as an instructor and hope to take more FDSA classes with her in the future.
I have taken 3 gold classes and Laura is by far my favorite Gold class instructor. Her feedback was always kind, clear, fair (to both the dog and handler) and focused on what we were working on. I really appreciate that Laura kept us focused on the most important aspects of a behavior and did not nit-pick all of the parts that were wrong or weren't perfect. She realized that we were progressing with time and recognized our successes as we progressed. She also did a great job of acknowledging/validating and/or giving feedback to my own video critiques. This helped me learn how to review my own videos better and in a way that was kind to myself.
I need a kick in the butt to do some of this TEAM training and this class fir the bill. Your detailed and astute feedback is amazing. Definitley uncovered some holes in our training, which is very important. You always find something positive to say, too! Please keep up with the TEAM classes - I think they are are great asset to the FDSA curriculum.
Registration
There are no scheduled sessions for this class at this time. We update our schedule frequently, so please
subscribe to our mailing list for notifications.
 Instructor: Laura Waudby