logo

  • Log In
  • About Us
  • Calendar
  • Faculty & Staff
  • instagram-icon
  • facebook-icon
  • twitter-icon
  • Courses
    • Schedule
    • By Discipline
    • By Instructor
    • Prerequisites
    • Self-Study
    • Scholarships
    • Gift Certificates
  • Webinars
    • Schedule
    • FAQ
  • Workshops
    • Schedule
    • FAQ
    • Gift Certificates
  • On Demand
    • Pet Dog Presentations
    • Pet Professionals Presentations
    • Self-Study Courses
  • Special Links
    • Podcast
    • Blog
    • Fenzi TEAM Titles
    • Trainer Certificates
    • Private Lessons
    • Other Free Stuff!
    • Swag
  • Events
    • Matters of Motivation - May 10, 2025
    • FDSA Training Camp - Maryland Sept 26-28, 2025
  • Contact
    • Course FAQ
    • Webinar FAQ
    • Workshop FAQ
    • Testimonials
    • Contact Help

FE670: Expose the Dog

  • Overview
  • Syllabus
  • Prerequisites & Supplies
  • Sample Lecture
  • Testimonials & Reviews
    • Registration
      Apply for a scholarship

  • See Also
  • All Classes
  • All Workshops

FE670: Expose the Dog


Course Details

"What settings should I use?"

If I had a nickel for every time I've heard that question, I could probably retire from photography. The thing is, there's no universal answer because light changes constantly, subjects move unpredictably, and every situation asks something different from your camera.

This course transforms you from someone who asks "what settings?" to someone who confidently reads any situation and chooses the best exposure strategy. Instead of memorizing recipes that only work in perfect conditions, you'll develop the judgment to handle whatever lighting throws at you.

In this class, you'll begin developing:

  • Skills for reading light like a photographer and understanding how different qualities of light require different approaches
  • Confidence using histograms as your exposure compass, not just pretty graphs
  • Quick, informed decisions about aperture, shutter speed, and ISO based on what the scene actually needs
  • Strategies for challenging situations like mixed lighting, high contrast, and rapidly changing conditions
  • The intuition to anticipate exposure needs before you even lift your camera

What makes this course different: I don't give you a list of "sunset settings" or "indoor portrait settings" that fall apart the moment conditions change. Instead, I teach you to think like light itself—to understand how it behaves, how your camera captures it, and how to make technical choices that serve your creative vision. You'll learn the "why" behind every exposure decision, building skills that adapt to any situation you encounter.

This isn't about perfect exposure myths or following rigid rules. It's about developing confident, flexible judgment that works whether you're shooting a backyard barbecue or a championship agility run.

For experienced photographers: You'll refine your exposure strategy, eliminate guesswork from challenging lighting situations, and develop consistent decision-making processes that work across different subjects and environments.

For developing photographers: You'll transform your relationship with manual mode from anxiety-inducing to empowering, building the foundation for all your future photographic growth.

Designed for All Learning Styles:

This course welcomes all types of learners. I present each concept in multiple ways so you can develop expertise effectively:

  • If you learn visually - you'll see before/after examples and real-time exposure demonstrations
  • If you prefer systematic instruction - you'll receive clear decision-making frameworks and step-by-step strategies
  • If you learn by doing - you'll practice with guided exercises that reinforce exposure concepts immediately

Each week includes one Skills Lab (designed for indoor practice with controlled lighting) and one Creative Lab (where you apply concepts to your own photographic interests, indoors or out). This structure builds your technical foundation while encouraging creative application.

Your camera's exposure system has been waiting for you to take control. Join Expose the Dog and experience the confidence of knowing how to choose your settings and why they work.

Prerequisites: Basic understanding of aperture, shutter speed, and ISO, plus some experience using manual exposure mode. Students who have completed Shoot the Dog, Chase the Dog, or equivalent experience are perfectly prepared for this course.
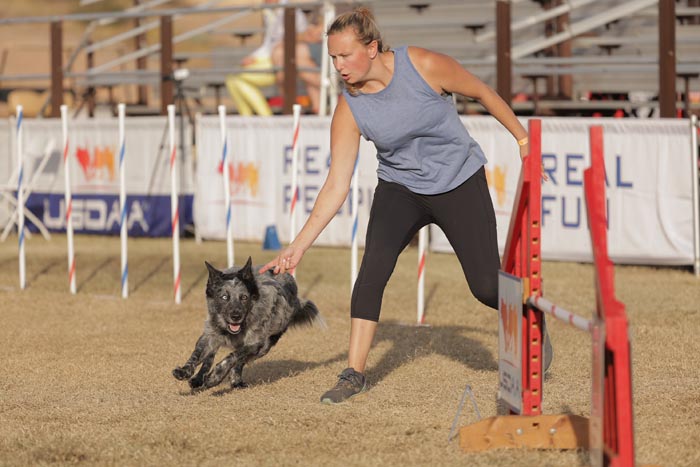
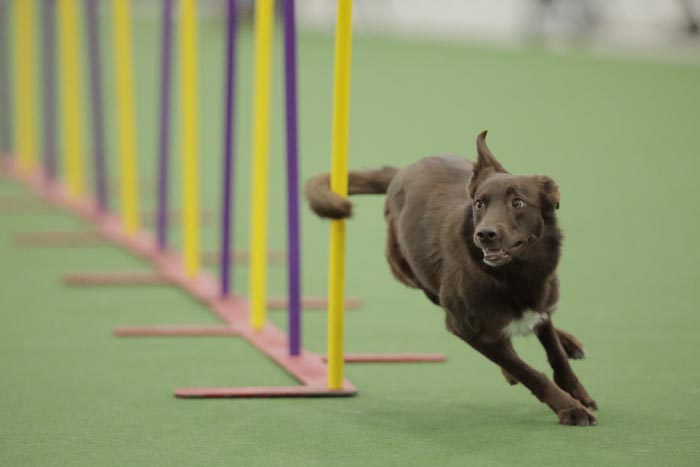
 

1r322120117_5867.jpg   1r323043004_0778.jpg


Teaching Approach

  • Lectures are released 1-2 times a week, along with a corresponding assignment that follows the lecture material. Gold students can submit images for each assignment as directed, as well as additional submissions with revisions to your images based on instructor feedback.  
  • Some assignments include step-by-step instructions to follow to demonstrate that the student understands a skill. Some are more open-ended, leaving more of the choices for the student to make in how they complete the assignment.
  • Lectures are primarily written, with supplementary videos from a variety of sources on YouTube.  Some videos may have subtitles, but it varies depending on the source.
  • This class will have a TA in the Facebook study group if it sells out at Gold.


Amy JohnsonInstructor: Amy Johnson

Amy Johnson (she/her) is the official show photographer for many of the premier agility events in the United States, including the AKC National Agility Championships, AKC Agility Invitational, USDAA Cynosport World Games, UKI US Open, and NADAC Championships, as well as numerous local trials, regional events, and breed national specialties.  She has photographed a wide variety of dog sports, including agility, obedience, rally, and conformation.  (Click here for full bio and to view Amy's upcoming courses.)


Syllabus

View Full Syllabus

Week 1:

Learning to see light
Review of Manual Exposure and the Limiting Factor Method
Using Histograms and "Blinkies"

Week 2:
Definitions of the characteristics of light
Front Light
Expose for the Highlight

Week 3:
Back Light
Expose for the Shadow

Week 4:
Side Light
Creating depth with side light
Deciding whether to expose for the highlight or shadow

Week 5:
Strategies for exposing challenging subjects
Catchlights

Week 6:
Shooting in RAW vs. JPG
Introduction to ETTR (Expose to the Right)
Final Project

Prerequisites & Supplies

View all Prerequisites & Supplies

Prerequisites

Students who have taken Shoot the Dog, Chase the Dog, or any of my other photography classes are qualified to take this class. Students who enroll at Gold are expected to have a basic understanding of aperture, shutter speed, and ISO and to have at least some initial experience using manual exposure mode on the camera.   

Supplies

Camera and lens

DSLR or mirrorless camera body and at least one lens.  If you were in Shoot the Dog or Chase the Dog, the same equipment you used for that class will work for this one.

Other equipment

For the Skills Labs, you will want a standalone light such as a shop light or an unshaded table light.  It should be something free-standing, not a flashlight that requires you to hold it.  But it should also be portable and have the ability to move around a (small) subject.  If you are buying something, look for one that uses LED bulbs to minimize the issue of heat.

This is not a fancy photography light. We are not doing studio lighting in this class. You simply need to be able to control the direction of the light for the Skills Labs. Something like THIS is perfect. 

You will need the following items to use as your subjects for the Skills Labs:

  • One white egg (real or ceramic)
  • Two small stuffed animals, one white, one black.  They should have glass or shiny plastic eyes so that they can reflect light. Eyes made from fabric or thread won't work as well. 
  • Suggestions for animals: 
    • Black - https://amzn.to/3v3PTzs
    • White - https://amzn.to/3odOJOh

Sample Lecture

More
 

The Secret to Picking Your Settings

Picture this: You're watching someone photographing dogs flying over jumps, and you think "I need those exact camera settings!" So you march over, get the magic numbers, dial them in, and... your photos still look nothing like theirs. Sound familiar?

Trust me, I've been on the receiving end of this question more times than I can count. I'll be at the ring at an agility trial and someone will see my camera (or, to be more accurate, they'll see my ginormous lens) and inevitably they will ask what settings I'm using. I sometimes rattle them off and sometimes I waffle a bit and give them a vague answer. It just depends on how generous I'm feeling that day. <grin>

The thing is, knowing my settings is only half the story. Yes, you can set your camera to the same exact settings I use and get a photo that is exposed the same way mine is. But what actually makes the difference is understanding the strategy behind those numbers. Without that foundation, you're still going to struggle with that screaming fast dog on the agility course.

When I tell someone I'm using an ISO of 80,000, the looks I get range from confusion to amusement (as if I'm pulling their leg), to outright disbelief. But when you understand how and why I chose my settings, ISO 80,000 makes complete sense. The difference is understanding the reasoning behind the numbers rather than just copying a "recipe" for your camera.

In this class, there will be no recipes. I will share my settings of course, but more importantly, I will share my strategy for picking those settings. My hope is that you will leave this class with a solid understanding of the process for picking your settings for any situation you want to photograph. (And you'll learn when you should just put away the camera and be present in the moment.)

Reality Check

If you've taken any classes with me, you know that I try to inject a strong dose of reality to balance out the fantasy folks imagine life as a photographer is like. 

You will be learning how to think through a process for selecting your manual exposure settings. This doesn't mean you'll nail it every time—I've been doing this for 25 years and I still mess up my exposure. STUFF HAPPENS. You'll practice, build fluency, and yes, I'll show you my screw-ups to make you feel better. This is about developing confident decision-making skills, not achieving perfection.

The Secret to Picking Your Settings

What is this secret? It's a strategy called the Limiting Factor Method (LFM). This strategy was introduced in Shoot the Dog, so we'll start with some review.

Galen Rowell, an accomplished landscape photographer, describes it this way:

"To shoot many different subjects in natural light, each with different technical requirements, I devised something I call the 'limiting-factor' method. Professional sports photographers gravitate naturally toward this way of shooting, but most scenic photographers focus on static subjects so often that they are rarely forced to organize their approach to technical problems — that is, how and in what order they adjust the camera's settings.

"The limiting-factor method instantly streamlines and reorders my mental checklist for each photo situation. I simply think of every photo as having one problem to be solved, a limiting factor, and I begin with that. If there's more than one, I pick the most crucial. If I can't think of one, I know I'm in one of those rare right-place/right-time situations where I can't miss."

Until I read this, I didn't even realize that this was a "thing." However, this is EXACTLY how I approach photography. I decide on the most important problem I have to solve in the image I'm trying to create and base my settings on it. This will nail down one of the three elements of exposure. Then I decide which of the two remaining elements is more important and dial it in. By setting the two most important elements, that leaves you no choice for the third element.

In order to effectively use the LFM, it is really helpful to know what things can be fixed or altered in post-processing and which things can't. I know we don't do any post-processing in this class, but I'll give you enough information here so that you'll know how to make that determination.

Let's look at this through the lens of our three exposure elements—aperture, shutter speed, and ISO—and what each one impacts:

Shutter Speed impacts motion blur—and you cannot fix motion blur after the fact.

You cannot fix a blurry photo.

This is worth repeating, so repeat after me: You cannot fix a blurry photo.

You must get your focus right or it's an image destined for the trash. No ifs, ands, or buts about it. Blurry image = throw it away. In general, if you have a subject that is moving, shutter speed will be your priority setting.

Aperture impacts depth of field—and you cannot change depth of field after the fact.

Yes, there are tools in Photoshop and Lightroom to add fake background blur, but there is no substitute for the natural blur created in the camera with a shallow DOF. In general, if you have a subject that is stationary, aperture will be your priority setting.

ISO impacts digital noise—and noise CAN be fixed after the fact.

High levels of noise can be cleaned up effectively. The noise-reduction tools in both Lightroom and Photoshop are very good. There is no reason to make ISO your priority setting. EVER. ISO is used to balance the other two settings — that's it! In my classes, you will never select your ISO first.

This is why the Limiting Factor Method works: you identify which of the first two problems (motion blur or depth of field) is most critical to solve, set that element first, then adjust the second most important element, and let ISO fall where it needs to fall.

The way we solve our "problem" is through a series of questions about the specific situation we are trying to photograph:

  1. What is the most important problem to be solved? Be sure to define this in terms of things that are controlled with camera settings, not problems in a broader sense.
  2. What setting (aperture or shutter speed) do we use to solve that problem?
  3. What is the value of that setting I will use to solve the problem?
  4. What is the value of the other non-ISO element (shutter speed or aperture)?
  5. What ISO will I have to use to get these other two settings?

This systematic approach transforms you from someone who copies settings to someone who creates them. No more guessing, no more hoping someone else's recipe will work in your situation. You'll develop the judgment to look at any scene and know how to approach it technically—whether you're shooting your dog in the backyard or tackling the challenging lighting at an indoor agility trial.


Testimonials & Reviews

Read All Testimonials

A sampling of what prior students have said about this course ...

Amy, I love your classes and your teaching style. I have learned a great deal and, while I'll always be learning and striving to get better, my photography has improved far more than I ever expected. I refer back to my lectures often and practice the skills you have taught. Thank you for sharing your knowledge and expertise.           


This is my 6th course with Amy, all at bronze, and I am more impressed with each one. each time, the students are at widely disparate stages of experience and understanding. She never makes the more advanced students feel held back, and never makes the beginners feel left behind. Good deal, but hard to achieve. Amy's lectures are clear and concise, and her labs are well designed for experimentation and discovery. I am very much looking forward, when time and schedule allow, to taking some of these classes at gold. Thanks yet again, Amy!             


Amy's photography classes have been so amazing! I have learned more than I ever expected to learn and have a renewed love with photography. I thought I was was okay at taking photos before but now I know so much more! Thank you Amy! If you ever want to learn more about photographing your dogs, this is these are the courses to take!          


This is the 3rd class I have taken of Amy's and anyone wanting to know more about photography would be wise to sign up. Plan on taking more with her.          


I really, really loved this class. I learned more in this class than I all the classes I've taken locally in person and in all the photography books I've read. The content was challenging but broken up in "do-able" steps. Amy was really supportive and I'd love to take more classes with her. MaryE            


As someone very green to the topic of photography I have found Amy to be extremely patient but firm with getting her points across. It has been a great help for me. This is a topic that made me want to put my head in the sand before...now it seems completely possible! With practice of course!

Registration

Next session starts: June 1, 2025
Registration starts: May 22, 2025
Registration ends: June 15, 2025

Registration opens at  10:30am Pacific Time.

FE670 Subscriptions


Gold

Silver

Bronze
Tuition $ 260.00 $ 130.00 $ 65.00
Enrollment Limits 10 25 Unlimited
Access all course lectures and materials ✔ ✔ ✔
Access to discussion and homework forums ✔ ✔ ✔
Read all posted questions and answers ✔ ✔ ✔
Watch all posted videos ✔ ✔ ✔
Post general questions to Discussion forum ✔ ✔ ✖
Submit written assignments ✔ ✖ ✖
Post dog specific questions ✔ With video only ✖
Post videos ✔ Up to 2 ✖
Receive instructor feedback on
  • Questions
  • All videos
  • Questions
  • All videos
✖

Find more details, refund policies and answers to common questions in the Help center.

  • Prev
  • Next
  • FDSA
    • About Us
    • What Do We Teach?
    • Faculty & Staff
    • Testimonials
    • Privacy Policy
  • Student Resources
    • Calendar
    • Scholarships
    • Gift Certificates
    • Swag
    • Trainer Certificates
  • Courses
    • Class Schedules
    • By Instructor
    • By Discipline
    • Prerequisites
    • Self Study
  • Webinars
    • Schedule
    • Webinar Courses
    • Register
  • More Learning
    • Podcast
    • Blog
    • Puppy Book
    • Private Lessons
    • Team
  • Help!
    • Getting Started
    • Enrolled Students
    • Video & Images
    • Webinars

Copyright © Fenzi Dog Sports Academy and individual instructors.

Technical support - send email to help@fenziacademy.com

Connect with us! facebook-icon email-icon instagram-icon