Core Courses
Core courses cover the skills required to allow a handler to engage their dog in training with energy, focus and fun! Courses are also designed to help you understand how motivational training works; from the first stages to when the toys and treats are gone.
Course Details
Interested in obedience or rally? This isn't a class full of heeling around in circles!
Learn about using foot targets, backing up, and fancy pivoting. Geek out about precise position changes such as the perfect foldback down, or learn what "good enough" style actually holds up when you are at a distance and the props are gone.
I will gently hold your hand on starting scent articles, and go outs and show you that they aren't as intimidating as they look!
And more!! No prerequisites are needed!
Introducing all these core areas from the start makes sure that obedience remains fun for both the dog and the handler!
Note that there are a LOT of skills at the first level and this class goes over ALL of them. You will not be able to do all the things in the 6 weeks of class! It's a good thing you have access to this class for a minimum of a full year!
This is an introductory course and makes no assumptions about your dog's prior knowledge. Whether you are new to competitive obedience training or you have discovered a need to revisit skills with advanced dogs, this course will help you prepare to title by video in TEAM. Additionally, you will gain an excellent set of foundation skills for any dog sport or competition venue, such as AKC or FCI obedience, rally, freestyle, and more.
For more information on the TEAM titling program, please visit www.fenziteamobedience.com
Teaching Approach
Lectures are released at the start of each week with all lectures released within the first 4 weeks. The lectures are broken down by each skill, often in multiple parts. I have written objectives and then written instructions for each step followed by multiple video examples for each step. The videos are usually between 30sec to 2min long and are taken from training sessions of a variety of dogs. I rarely use voiceover or subtitles in the video. At the end of each lecture is a homework summary with the steps quickly summarized in order.
Several videos will depict training being done with the handler sitting on the ground. These steps can be modified to be sitting in a chair, and may also be modified to have the dog at a higher level such as up on a tall platform or on a bed.
This class will have a Teacher's Assistant (TA) available in the Facebook study group to help the Bronze and Silver students! Directions for joining will be in the classroom after you register.
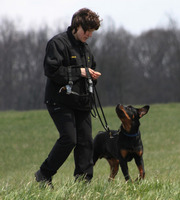 Instructor: Lucy Newton
Lucy Newton (she/her) has been training dogs and teaching dog training almost all her adult life. She was a search & rescue dog trainer, handler, and instructor and trained numerous personal dogs for wilderness search and rescue, as well as land and water human remains detection. Working with very active wilderness SAR teams, she worked on a large number of missing person cases in both urban and very remote wilderness locations. (Click here for full bio and to view Lucy's upcoming courses)
Syllabus
Because of the wide range of skills, students are not expected to master all 9 areas of focus in roughly 15 skills. About 3-4 skills will be introduced per week and gold students will have the option of working on any of the skills discussed from the current week or previous weeks. All lectures will be introduced in the first 4 weeks of class in order to give students enough time to focus on the topics of their choosing.
No team will be able to get through every single topic!! It is common for students to repeat this class or to work on it for several months!
Roughly the order of skills taught will be:
Week 1: Engagement, Paw targets (front foot, rear foot, and all 4 feet), Auto leave it, doggy zen games, Fly around a cone, Pivoting for heelwork
Week 2: Position Changes(Sit, Down, Stand), Chin rests to hand and to a lid, Fronts
Week 3: Backing up, Scent Articles, Vertical target (for Go Outs), Release cues and stays
Week 4: Jumping, Building Distance of Position Changes, transitions between exercises and setups for TEAM
Week 5 & 6 will be continued work on any of the above skills.
Students will also have the opportunity to send in a video of a potential TEAM video submission to get feedback at the end of class.
Prerequisites & Supplies
This is a FOUNDATION level class designed to introduce the beginning steps for each of the areas up to the point that the TEAM level 1 test includes. No experience is necessary to start!
Puppies as young as 8wks are welcome to join, however unless the trainer is already very experienced, it is typically recommended that puppies be 4+ months of age. Younger puppies may not physically be ready to work on "all the things" as they are still really learning how to earn food and work with their trainer.
The equipment needed is dependent on which skills each team wants to focus on. Upon registration, a supply list lecture will give more in depth information on how to make, purchase, or scrounge up from around the house for your supplies! Ideally, teams will have access to:
- Platform for fronts and finishes (approximate size just barely longer than the dog is wide and long enough for the dog to stand on)
- Perch for pivoting (round bowl, phone book, brick...)
- Large cone or another object for the dog to circle around
- Foot target for position changes (PVC box, front foot target, rear foot target...)
- Altoid tins, flat metal electrical plates, canning lids, or any other type of a flat surface for dogs to learn a nose target indication for scent work.
- Jump (formal obedience/agility jump OR creative jumps such as a broomstick, log....)
Sample Lecture
Backing Up - TEAM Level One Sample Lecture
By Laura Waudby
Goal of the Exercise
The goal of this exercise is to teach the dog to back away without any forward motion from the handler into the dog's space.
This skill is extremely useful to add into other exercises where the dog needs to perform at a distance. If the dog begins to associate backing up after completing a command (e.g., down signal followed by backing up), it will reduce the dog's natural tendency to creep forward.
In TEAM, this skill will show up in more advanced levels to demonstrate the dog's ability to think rather than simply anticipate what comes next.
Training with a Back Foot Target
The most common way to teach an independent backup is by using a target placed behind the dog. A target gives the dog something to aim for and encourages them to reach with their back feet to find it.
Before beginning we want a default stand on the rear foot target and the dog calmly waiting for the treats to come to them.
Here is a quick clip of Vaughn working on waiting on his rear foot target for the treats to come to him! This commitment will help the backing up skill!
Step 1: Stretch the Dog
At this first stage, we're not doing any backing up! Our focus is on stretching the dog from the target so that both back feet remain on the target as their front feet get further and further away.
Give your dog a cookie while they are in the 2on/2off (2o2o) position. Then give another cookie just an inch further. And then another cookie placed another inch further away. Keep giving your dog treats progressively farther from the target until their back feet come off it. Pause, then help your dog in making a U-turn back into the 2o2o position.
At this stage, you're looking for the dog to try really hard to keep their rear feet on the platform even with a tempting cookie!
Here, Arlo is working on this skill. He gets on the target relatively easily, and I'm trying to feed him slightly farther away. He knows to get back on the target when he comes off, but he isn't backing up yet, and that's okay! You can see I can't stretch him very far yet, as he comes off pretty easily. However, he is showing a small weight shift forward. At 48 seconds, there is a nice small stretch, and again at 57 seconds!
Here Splash is working on this early step of keeping his back feet on the target while I feed further away. You can see that he's already showing some stretching, but does come off very easy still and sometimes wants to back up to get his front feet on the target. He's also still going to do a u-turn to get back onto the target! I'm happy he's showing those signs of knowing getting back onto the target gets the cookies to come again!
Ravioli is struggling to get much of a stretch but he is showing a clear weight shift back! While I don't really want him focused on needing to move his front feet so far back, this is still a good sign that he's right on the verge of being able to get more stretching of his rear legs!
And here Loot is showing the end result of this first step. He's stretching pretty well for the treat in my hand and I'm still trying to reset behind him to make sure he's not thinking about coming off forward. He does 1 teeny tiny 1 step back up here in the middle!
Step 2: Tiniest Backup
At this stage, you're seeing the dog really stretch to keep their rear feet on the target. When the dog comes off, they turn around to get back onto the target themselves. Now you're so close to getting just one tiny step of a backup!
Try to do your stretching so that only one paw is off the target, if possible.
When the dog is out of their 2o2o position pause and wait. Let the dog think! If the dog backs up the one paw needed to return to position, then reward! If the dog moves forward and circles back to their target you can reward this initially, but soon limit rewards to actual backing up. (Praise the dog for getting on the target, but do a stretching rep to give the next cookie instead of just feeding them for getting on the target.)
Do not introduce your backup cue at this stage as the dog is focusing more on their target than on the actual actions they are taking to get there.
Here Quill is right at the stage where he's offering the tiniest one step backup!
And here is Freya Cat! Sometimes I get her off too far, but if I can get only 1 foot off she will usually step back to find her target.
Vaughn has a consistent 1 paw backup and great stretching skills. I am cuing a "release" for each rep instead of purely ending with a "stretch" so it's easier to get his rear feet off without him being super far away! He does some turn around, but mostly is figuring out the backup!
If your dog still struggles and is just not offering any bit of backing up, you can encourage the dog to at least back up their front feet after some stretching. Feed out a few times, then lure the dog back with their front feet BEFORE the dog's back feet come off. Think of it like an accordion!
Here I'm demonstrating this accordion feeding style with Splash.
Step 3: Distance of Backing
At this stage, the goal is to increase the distance your dog can back up to their target until you reach about three feet.
I typically want to switch to a LOWER target. A target that is too tall often causes the dog to reach too high with their hind feet, resulting in some awkward backing! My ideal backup target is just an inch off the ground. Be sure to warm up with some "stretching" reps so the dog understands it's a target!
For many dogs, this is a difficult step. Increase distance very slowly and always mix in easier repetitions so that it is not always getting more and more difficult for the dog to perform. A verbal cue and/or hand signal can be used once the dog is consistently backing up, not turning around, and some distance is worked through.
Here Freya shows backing up when both feet are off the target!! She sometimes sits and that in the past would have guaranteed she wouldn't backup, but she's able to do that here! Sometimes she stops when her rear feet hit the edge but she doesn't step up. I still mark and gently push her back with the reward she earned. (note I added the verbal backup cue here because she's been consistent for me, but this was the first session I did that! Don't add the backup cue until you are confident the dog is going to offer it!)
Here Cougar is starting to get pretty consistent with a distance of three feet. Note that the movement is still very awkward for her and not at all fluid! I should have switched to a lower target before building to this distance. This higher target isn't great for the style I want.
Speck is working with a low target and a small distance. He's kinda hoppy with his backup motion still.
If Speck doesn't start to do more stepping instead of hopping in the next few sessions, he would be a good candidate to combine some of this rear foot target work with the channel method listed below.
Crookedness???
If the dog is backing up crooked but still reaches their target, then this isn't something I worry about in the early stages!! The target itself will help correct the dog if you're only paying when the dog makes their rear feet on it! You should see your dog start to sidestep to the target if they initially miss it.
Here's a visual example of how the farther away you get form the target, the narrower the dog's options are for the angle they take. If you're with a step or two from a large target, the dog has a big range (and that's ok!). And as you get to even 2 body lengths away, then their angle for being correct naturally gets smaller.
But what if the dog is missing a bit and chooses to self correct to get back on? That's ok too! As long as the dog moves sideways instead of turning around, I reward. I want the dog to know that the target matters! However, don't progress on distance if this is happening a lot!
Here is Wren who shows a strong preference for backing off crooked to my left. Since she's still in the early stages, I'm letting her self correct her angle and I'm occasionally helping with her reward even if she only gets one foot on (I'll stop doing this as she progresses.) I'm also purposefully setting her up so that more of the target is to my right and the space she has is narrower to be accurate. This is drawing more attention to her crookedness and force her to think about the target more!
If your dog is not figuring out how to move slightly sideways to self-correct, you're close to the target, and you're just not having success, let's look at a few other ways you can help your dog:
- Taller target. Is your dog really noticing the target and caring about it? Taller isn't great once you want distance, but it's helpful to draw attention to the target in the beginning! Most crookedness errors I see are because the dog doesn't have enough value for getting to that 2on2off position! They are too focused on the cookies in our hand.
- Using a barrier on one or both sides. Place your rear foot target near a wall or couch on one side to apply light pressure and prevent crookedness in that direction!
- Look at how you're rewarding the dog. Is the dog automatically eating and turning crooked before they even start backing?! Try feeding back between your legs a bit so your legs become a small guide to start the dog off right. Or sit on the floor and stick out your legs in a V (or use gates!) to get that initial angle started!
As Wren's backup progressed, that little lean to my left/her right went away! But a more persistent starting angle to my right/her left started to come. You can see in this video that it's a small lean that is hugely exaggerated by her start angle. She was self correcting, but we were struggling with her start angle. I first tried using my legs to try and set her angle but this greatly confused her so I went to using some light barrier pressure to try and prevent her from starting off crooked.
For bigger crookedness, you may want to use a channel.
Here is an example of combining a channel with a rear foot target. Freya Kitty is pretty content to just sit in the channel but she can offer tiny backups in here when both feet are off her flat target.
Step 4: Wait for the Cue
Proud of your dog's backup? Now we can work on them actually paying attention to what your cue is! For TEAM, the anticipation of backing up is the biggest reason for a "Not Yet." Your dog needs to wait calmly in front of you until you give that backup cue.
Feed lots for waiting! Have the goal of getting your hands to your side between each treat so that yourdog can't tell when you're going to give another treat after the pause vs cue the backup.
Here Ravioli is doing really well in learning to wait! So many snacks for waiting! And starting to get hands to my side towards the end of the video.
Since many dogs will struggle with being able to process cues with their beloved rear foot target behind them, I find it easiest to start with another foot target to have them wait on. Grab a front foot target and put it far enough away that your dog can't be on both the rear and the front foot at the same time.
Here I'm working on Loot waiting for the cue to back. You can see that sometimes when he's on the front foot target he forgets about the rear foot target and what backup means! I need to do some quick reps of get a cookie on the front foot target, then backup quickly to the rear. Unfortunately, he's having a hard time this session, but hopefully it gives you an idea of a setup!
If your dog knows a chin rest, you can use that too! Keep in mind that the removal of your chin rest hand will quickly become the cue to backup if you always cue a backup after. Try to do a small chin rest, mark/reward, then present your chin rest hand again. Give the backup cue with hands starting at your side, but make sure your dog isn’t able to predict when your hands at your side will lead to a backup vs leading to another chin rest or just a cookie for waiting!
Here Mayhem then Loot demonstrate how I work to use a chin rest to help them wait. I am working on getting my hands to my side, then presenting the chin rest cue or cuing the backup. Mayhem is a bit twitchy in wanting to backup as my hand goes away and you will also see how her chin rest quality starts to deteriorate as she thinks through this exercise! Loot takes a little time to settle but then does well, although his backup is more hesitant!
Overview
1. Start with the dog in their 2o2o position.
2. Try to feed the dog several cookies while they keep their rear feet on the target. Gradually move your cookie hand further for each reward. Try to get at least three rewards in before they come off!
3. If the dog moves off the target, reset them back onto the target.
4. Over several sessions see the dog start to stretch to keep their feet on the target!! At this point, you might see occasional one step backups!
5. Once your dog is consistently backing up to the target, make sure you start to reward them for the 2o2o position, but then also release them to a cookie in your hand at a small distance so you can set their start point.
6. Wait for the cue!! For the dog to truly understand what backup means, they have to get out of offering mode and pay attention to what your cue actually is! Have your dog wait in either a sit position or on another target until you give the backup cue.
Have the goal of hands to your side between each treat so your dog doesn't know if they're getting a treat next or if they're going to get the greenlight to backup.
Testimonials & Reviews
A sampling of what prior students have said about this course ...
The sport of obedience never interested me before. But when looking for my next class, I read the summary of Laura's class. It sounded interesting, it was a foundation class so I was confident I could do it so I gave it a shot. Now I'm in love with the sport of obedience. I love Laura. She was fun, her instructions were clear, plenty of videos to watch for examples. She gave us options and made her expectations clear. She always found something to reinforce but at the same time coached us to be better. I will definitely be taking Laura's level 2 in December and hope for another Gold spot
I am so glad I took the TEAM class this term. The course material was extensive and well organized. I feel we have made good progress towards our level 1 certification. Laura provided very awesome videos and comments which were detailed and easy to follow. You'll definitely want this course in your library!
Two exercises for this class -- pivot and backup -- were ones I have struggled to teach my dogs for literally years. With this class, I had improvement on both in MINUTES
Taking my first class at Fenzi Academy was an incredible experience start to finish! My instructor was incredibly knowledgeable and was helpful to my individual needs. When I ran into road blocks with my dog's progress and nothing was working, she came up with solutions for my guy that were positive! This is one place that you can find just about any sport you could possibly want to learn with your dog and I'm excited to continue this adventure with my whole canine family! Lori R.
Thanks Laura and well done! You did a brilliant job considering the huge amount of information you had to impart and the range of different skills you were teaching. The clear breaking down of each skill into smaller steps in the lecture notes (and each step with its own demonstration video) was perfect. I'll be referring back to your lecture notes for a long long time to come!
Laura has helped me in so many ways throughout this class. She is quick to respond to class homework. Her comments are always positive and she always gives detailed instructions. Laura has a real gift for catching the "little things " that need improvement, and motivate me to do the extra work necessary to improve my skills. Her gentle guidance has helped me become a better trainer.
She could see my shy boy for his sensitivity yet being eager. She re-directed us in ways that helped and supported him without over-energizing or shutting him down. And with just 2 silver videos, not 6 weeks of staring at us!!
Laura gives the most amazing detailed feedback. She has an excellent eye and can tell right away what will help a team succeed.
Registration
There are no scheduled sessions for this class at this time. We update our schedule frequently, so please subscribe to our mailing list for notifications.
Registration opens at 11:30am Pacific Time.
TR101 Subscriptions
 Gold |
 Silver |
 Bronze |
|
|---|---|---|---|
| Tuition | $ 260.00 | $ 130.00 | $ 65.00 |
| Enrollment Limits | 12 | 25 | Unlimited |
| Access all course lectures and materials | ✔ | ✔ | ✔ |
| Access to discussion and homework forums | ✔ | ✔ | ✔ |
| Read all posted questions and answers | ✔ | ✔ | ✔ |
| Watch all posted videos | ✔ | ✔ | ✔ |
| Post general questions to Discussion forum | ✔ | ✔ | ✖ |
| Submit written assignments | ✔ | ✖ | ✖ |
| Post dog specific questions | ✔ | With video only | ✖ |
| Post videos | ✔ | Up to 2 | ✖ |
| Receive instructor feedback on |
|
|
✖ |
Find more details, refund policies and answers to common questions in the Help center.
Course Details
Feeling stuck, intimidated, or overwhelmed working on obedience skills with your dog? If you feel like you’re not sure what to train, or if what worked for your last dog isn’t working for this dog, this class may be for you!
In the TEAM 2 class we provide structure as you build the skills your dog needs for TEAM, AKC, CKC, FCI, or the other obedience program of your choice! Let's break down the fancy skills you've seen in obedience trials!
In this class we introduce new skills while continuing to build the skills from TEAM 1:
- Retrieves [NEW for TEAM 2]
- Marking (look forward cue) [NEW for TEAM 2]
- Pivoting without a prop- left and right (the foundation for pretty heelwork!)
- Position changes in heel (and teaching a stand cue!)
- Scent articles
- Engagement-: "transitions" between exercises
- Sends to a target
- Jumping
- Stays with distractions
- Finishes
- Fronts (teach fancy front pivots to get that amazing lineup!)
Took the TEAM 1 class, but still working through the skills? That’s okay! Join us for TEAM 2 and we’ll continue to work together to get you unstuck and making progress.
The individual pieces of exercises are broken down for you in manageable steps. Introducing all these core areas from the start makes sure that obedience remains fun for both the dog and the handler!
Join us this term to take your and your dog’s obedience to a new level!
What is TEAM?
The TEAM titling program is a virtual program designed to help reward obedience trainers for breaking down their training and building a strong base of foundation behaviors.
Each level adds complexity for the dog-handler team, presenting them with a wide range of interesting skills to master right from the start. There’s no reason to hold back on training for distractions, distance work or the "fancy" skills while teaching your dog to heel!
Check out the full program on the TEAM website: https://www.fenziteamobedience.com/
Note: You do NOT need to be interested in TEAM titles or have taken the TEAM1 class to join! Many students use this class as a roadmap for AKC/CKC/etc. If you don’t have TEAM 1 in your library, it’s helpful to at least have
- Pivoting on a perch
- Position changes started in front of the handler
- Fronts with a platform
Teaching Approach
Lectures are released at the start of each week with all lectures released within the first 4 weeks. The lectures are broken down by each skill, often in multiple parts. I have written objectives and then written instructions for each step followed by multiple video examples for each step. The videos are usually between 30sec to 2min long and are taken from training sessions of a variety of dogs. I do not use voiceover or subtitles in the video. At the end of each lecture is a homework summary with the steps quickly summarized in order.
This class will have Teaching Assistants (TA) available in the Facebook discussion group to help the bronze and silver students! Directions for joining can be found in the classroom after you register.
Instructor: Lucy NewtonLucy Newton (she/her) has been training dogs and teaching dog training almost all her adult life. She was a search & rescue dog trainer, handler, and instructor and trained numerous personal dogs for wilderness search and rescue, as well as land and water human remains detection. Working with very active wilderness SAR teams, she worked on a large number of missing person cases in both urban and very remote wilderness locations. (Click here for full bio and to view Lucy's upcoming courses)
Syllabus
Because of the wide range of skills, students are not expected to master all 10 skills. About 3 skills will be introduced per week and gold students will have the option of working on any of the skills discussed from the current week or previous weeks. All lectures will be released in the first 4 weeks of class in order to give students enough time to focus on their desired areas.
The skills taught will be:
- Retrieve: Beginning steps to picking it off the floor and delivery to hand. Teaching a hold!
- Fronts: Fading the prop, working on pivots in front
- Position Changes (sit, down, stand): Working in heel position, building in pauses, building greater distance, adding handler distractions
- Moving Engagement/ Social Play for working on "transitions" in the ring
- Pivoting Skills: Fading the perch with left pivots and starting pivoting to the right
- Finishes: 3 styles of finishes, fading props, proofing heel position
- Stay: duration, distance, distraction behind the dog, handler's back turned
- Jumping: taking a jump without handler movement
- Scent articles: Fading food lure in finding your scent, switching to a retrieve alert
- Mark: Teaching a cued look straight ahead, watch me vs look forward on cue
Release Schedule:
Week 1: Pivoting left and right in heel, Position changes (heel position and pauses), Marking, Send to Target
Week 2: Retrieve, Fronts, Position Changes (marching and distractions)
Week 3: Scent articles, Finishes, Position Changes (distance), Play/engagement
Week 4: Stays, Jumping
Remember each student can pick what they want to work on each week from any of the topics a lecture has been released on. Students will likely not be able to master all skills in the 6 weeks and will focus on topics they need the most guidance in.
Prerequisites & Supplies
The exercises in this class build off of those in TEAM 1.
It is recommended that Gold students have either taken TEAM 1 (OB115) with either instructor at any level (gold, silver, bronze), OR have passed the TEAM 1 test.
Many of the gold teams will still be working on level 1 behaviors while ready to start level 2 work with other behaviors!
It is HIGHLY recommended that students start looking a level ahead of where they are at early on. This prevents boredom for both human and dog, and allows the dog to advance in exercises that are well known without getting "stuck" rehearsing only the earlier level. Gold students will be able to work at the level they are currently at, even if it isn't quite level 2 ready!
If you do not have the TEAM 1 class, the following skills are prerequisites (NOT needed if you have the level 1 lectures!). While not all the skills are needed since you can't work through every single topic in just 6 weeks, I will refer students back to level 1 lectures for any skill that isn't ready for the level 2 notes:
- Pivoting in heel on a perch
- Understanding of how to teach sit and down with a front foot, rear foot target, OR a platform.
- Stay with a zen bowl/distraction on the ground
- Front to a platform
- Scent articles started (to food in a container or a smear of food on the article is ok!)
Equipment needed is dependent on which skills each team wants to focus on. Ideally, teams will have access to:
- Perch for pivoting (round bowl, phone book...)
- Dumbbell or other formal retrieve object (something the dog does not see as a "toy"
- Foot target for position changes (Whatever the team is used to such as PVC box, larger platform, front foot target, rear foot target...)
- Scent articles. Teams who have been working on a nose touch indication to a flat lid may continue that, or we can talk about switching to a retrieve alert if they are ready. Retrievable articles might be canning rings, leather bracelets, or traditional dumbbell shaped articles.
- Jump. Any jump will work!
Sample Lecture
Fronts Pt1: Beginning Front Pivots
Goal of the Exercise
A front is when the dog moves to sit directly in front of you. Both their head and their rear end should be lined up squarely with your belly button and your hands should be straight down at your side. In TEAM1 we worked on the dog getting used to the position by using a platform. The platform allowed us to have a high reward rate for the dog finding the perfect position and seeing our body position. If your platform was narrow enough it made it impossible for the dog to be wrong if they made all four feet on it.
Now in TEAM2, we need to teach the dog how to find front when the platform is gone. If you are lucky, your dog will naturally generalize the position in front of you and will find the center position even when the platform is gone. However, many dogs don't make this jump in logic!
Fading the Platform: Starting Front Pivots
Fading the front platform and keeping a confident dog who can line up straight is a common struggle. Many dogs learn that "front" means sit close to the handler, but they're not thinking of it as an actual position to aim for
The best success I've had in getting a dog to think about the position is to work on having them pivot in front of you. Unlike the platform, a perch structures the dog but still allows for errors. The dog needs to think a lot more!
Beginning Clockwise Pivots
We're going to focus on teaching the dog how to move clockwise before we officially start "fronts." From your heelwork training, the dog knows how to rotate counterclockwise, but you may not have spent much time going clockwise before!
Make sure your toes are pointed towards your perch. With your toes facing the perch it is impossible for your dog to get into a proper heel position!
If possible, try to have your dog nibble on some treats while you step to get your toes facing the perch so that your dog is facing you, not at your side. Give them several treats just for being there and not moving to try and get into heel.
Then try and step to your left around the perch, with toes still facing in, to encourage the dog to move clockwise. Reward any effort!!!
We don't want to get all the way to their rear end and directly push into them. If your dog is struggling to move, try being further away from the perch so you can be slightly behind them instead of at their side.
Here Freya Cat is starting this exercise. You can see how she really wants to rotate counterclockwise! I am attempting to move myself back to "front-ish" position after feeding her if I get too far into her space. But you can see how I then try standing further away from the perch so that I'm applying some pressure but not touching her:
Front-Ish Goals!
When your dog can move clockwise and counterclockwise on the perch, we're going to tighten up their position in front of us.
Because most dogs still really want to try to get into heel, at least 75% of your rotations might be done clockwise!
Your first big goal is to loosely get the dog back in front of you on the perch and keep them there! Feed several times for the dog being in front of you by either lowering both your hands down to feed at the center of your body, or slightly turning their head in one direction to try to gently move the dog a little bit closer to straight.
Rotate a quarter turn only after already giving the dog several cookies in a row for stillness!!
Bring both of your hands together as you feed and present the treat in the center of your body. This helps to prevent the dog from leaning to the side that has the treats!
Here with Wren I demonstrate how frequently I want you to feed in front!!!! Focus on position over motion. Note that her position isn't perfect and that's ok. I will shape for straightness once I'm certain she's not going to be a "windshield wiper" and offer motion back and forth when I'm standing still. In this video we're starting to get to the step where I could feed, take my hands back to my side (my formal front picture!), and then quickly feed again!!!
And here Freya Cat is at this stage of thinking more "front" thoughts. She under rotates more going clockwise and I try to move myself to be straight as I feed. I spend way more reps going clockwise than counterclockwise because it's the harder direction!
In the video above with Freya, I'm giving her extra help with my hands in front of my legs because she's a cat. You can start out with this help if your dog is really prone to surging past you, but try not to give this hand help for very long.
A great way to start fading hand help is to rotate-feed-then hands to your side for a small pause before feeding again! You can do a few cycles of hands to side-feed- hand to side- feed before rotating again. This will show your dog what the final picture looks like!
Here is Aero's first lesson on front pivots. I primarily go counter-clockwise as she really wants to suck into heel! I try to feed multiple times in front, but I can't get my hands to my side quite yet for their "home base" and instead rapidly feed and put them back to my stomach. At the 1:30 mark I attempt a little bit of going clockwise towards heel and quickly catch her with my cookies to prevent over rotation.
Arlo is also new to front pivots and really wants to offer going to my side. I'm doing a lot of work on stillness with my zen hands out. Tons of hands to side-feed- hands to side-feed! I do some cookie toss breaks here but he's not really ready for finding front so I try to catch him with a treat as soon as he's stepping up on the perch.
Catch Up Fronts
At this next stage, your dog should be pivoting pretty well with you in front-ish position as you move quarter turns around the perch. Now we want them to start pivoting to find front without the help of your movement. To do this I play a "catch up" game where I either have the dog stay while I rotate a quarter turn and then release, OR I have the dog nibble on a cookie as I rotate a quarter turn (dog doesn't move), then release the cookie and let the dog catch up to me to find front.
Here I'm working on this game with Kiwi.
Arlo is working this skill and he is really prone to over-rotating. I use my zen hand held out away from my body as a tiny bit of pressure to stop him in the direction he wants to rotate. This is a well known game that reminds him to focus on me, not the cookie, and thus he doesn't want to get too close to my hand. If he under rotates, I move away from him to help him go further. (You'll also see he's getting more advanced and I don't always help him when he's coming back from a cookie toss!)
Here I see that Mayhem consistently under rotates. Watch how as I feed her I start to rotate as I feed to get her straighter. I then do a quick hands to side-feed cycle in there to emphasize this position before doing the official catch up game where I have her nibble as I move.
Sophie the Poodle is doing a pretty nice job at this stage. Her handler is using a cue to "Front" but you don't need to do that at this stage unless your dog is really hesitant to move. Sophie offers wonderful stillness once she's in front and frequently is clicked for the duration instead of the rotation itself. That's a great next goal!
Fixing Crooked Fronts
When your dog is starting to get how to line up in the center of your body, you can use the pivoting to fix crooked fronts. Pivoting to face AWAY from the dog on a slightly crooked front can draw the dog's attention to what direction they were crooked.
In this drawing you will see the dog being crooked and then the handler moves to face away from the dog's butt so the dog has to rotate further to find it.
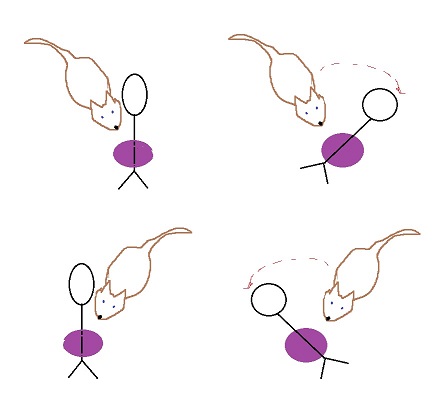
Here's a video demoing how to pivot around.
Problem Solving Pivot Fronts:
If your dog is struggling to rotate with you in one or both directions, I've had good luck in adding in a rear foot target for the dog to find! You can use anywhere from 1 to 3+ rear foot targets stationed around the perch, with the perch at the "center" of the clock. Make sure they are at a good distance for the dog to be able to have their front feet on the perch and their rear feet on one of the targets!!
You may wish to start with the dog rotating with you as you move before adding in the "catch up" front game.
Here Rye demonstrates this with a nice tall rear foot target. The height can draw attention to it, however the narrowness of the target does add some difficulty in having the dog confidently step up at a precise angle:
And here Enzo is working on it with nice lower rear foot targets. I like how when Enzo doesn't move all the way, he's verbally encouraged to keep moving so that silence doesn't mean try again:
Next Loot shows this technique, starting with the catch-up pivots and moving into the "find front" work (see the next section.) The cookie tosses to come into position are a bit harder as I do want the dog to step on with their front feet on the perch first and rotate vs stepping onto the rear foot target and walking forward onto the perch. I have better luck with this for Loot when I have just 1 RF target out (1.07) and use a slightly wider target:
Overview
1. Review Zen Games with a platform!! Teach your dog to line up straight even with tempting treats held low to the side or on the ground!
2. Start clockwise pivots on a perch!
3. Start front pivots on a perch!! Help them out with lots of cookies for stillness and have the goal of hands returning to your side between each treat (and likely feeding again before rotating).
3. Play the "catch up" game where the dog is already on the perch and waits while you rotate a quarter turn before you release them to find front.
Consider adding in a rear foot target to help them if they are struggling to line up.
Testimonials & Reviews
A sampling of what prior students have said about this course ...
This is a great class and a great instructor. The team program is lots of fun for both handler and dog- it presents obedience skills in chunks that build neatly upon each other. Laura's videos are clear and very helpful- she has an excellent eye for each student's need, and is able to quickly find the tweak need to make the team successful.
I found Laura to be kind and understanding when I was having difficulty and genuinely happy for us when we made progress. I'm hoping to return for Level 3 to continue the fun challenges.
Laura, I can't thank you enough for all the feedback and video examples that you have given me the past 6 weeks!! I feel that I can now continue training Brodie by following the many suggestions that you have given me. I can hardly wait for T3! Also, I liked that you posted all the lectures at the beginning of the course. It gave me a chance to choose what I thought would be most beneficial for me and my dog.
This was a great class! We were able to work at our own pace and cover the exercises and skills that we needed the most help with. Laura was terrific, offered great critiques and a variety of strategies to tackle each problem, often running off to make a video with her own dog to demonstrate a point. It was like having 6 weeks of private lessons in whatever we most needed! My observation is that all of the dogs and handlers improved over the 6 week course. I would recommend it to anyone interested in learning foundation skills and perfecting them, and to anyone interested in the TEAM program.
Thank you,Laura,for all the time and effort you are putting forth making your classes so very valuable! Appreciate the extra videos you post for individual students!
Awesome lectures, awesome feedback , awesome problem solver, awesome timing of feedback to students, awesome ability to break down desired behaviors, awesome dedication as Laura has been known to whip out a new video for students so they have a visual aid, awesome ability to watch each and every moment of your video. Did I mention she was awesome? I can not think of one thing to recommend for improvement.
Registration
There are no scheduled sessions for this class at this time. We update our schedule frequently, so please subscribe to our mailing list for notifications.
Registration opens at 11:30am Pacific Time.
TR101 Subscriptions
Gold |
Silver |
Bronze |
|
|---|---|---|---|
| Tuition | $ 260.00 | $ 130.00 | $ 65.00 |
| Enrollment Limits | 12 | 25 | Unlimited |
| Access all course lectures and materials | ✔ | ✔ | ✔ |
| Access to discussion and homework forums | ✔ | ✔ | ✔ |
| Read all posted questions and answers | ✔ | ✔ | ✔ |
| Watch all posted videos | ✔ | ✔ | ✔ |
| Post general questions to Discussion forum | ✔ | ✔ | ✖ |
| Submit written assignments | ✔ | ✖ | ✖ |
| Post dog specific questions | ✔ | With video only | ✖ |
| Post videos | ✔ | Up to 2 | ✖ |
| Receive instructor feedback on |
|
|
✖ |
Find more details, refund policies and answers to common questions in the Help center.
Course Details
Have big obedience dreams, or want to dip your toe in and give obedience a try? This class will give you an excellent set of foundation skills for AKC, CKC, FCI obedience, or freestyle and it will help you prepare to earn your TEAM 1 title!
Start a new dog on the right foot or discover missing pieces in your training. This class is specifically designed to cover all the exercises in TEAM Level 1 and give you a tiny start for TEAM 2. The TEAM program lays out the building blocks for developing very solid behaviours that the dog can perform in a variety of unique presentations and all of the obedience venues!
The 10 skill areas assessed in TEAM include: Engagement and Focus, Recalls, Fronts, Distance work, Targeting, Jumping, Scent Work, and Impulse Control, Rear End Awareness aka Pivots and Stays.
Each individual exercise is broken down for you in manageable steps. Introducing all the core areas from the start makes sure that obedience remains fun for both the dog and the handler!
This is an introductory course and makes no assumptions about your dog's prior knowledge.
Teaching Approach
Lectures are released at the start of each week, with the majority of lectures released within the first 4 weeks. The lectures are broken down by each skill; highlighting multiple parts. Each lecture has an objective of the exercise and applications, followed by written instructions and video examples for each step. The videos are generally 1 to 2 minutes long and show actual training sessions. No voiceover is used during the video. However, occasional subtitles are in the video. Homework summaries are at the end of each lecture.
For more information on the TEAM titling program, please visit www.fenziteamtitles.com
Instructor: Lucy NewtonLucy Newton (she/her) has been training dogs and teaching dog training almost all her adult life. She was a search & rescue dog trainer, handler, and instructor and trained numerous personal dogs for wilderness search and rescue, as well as land and water human remains detection. Working with very active wilderness SAR teams, she worked on a large number of missing person cases in both urban and very remote wilderness locations. (Click here for full bio and to view Lucy's upcoming courses)
Syllabus
There is a wide, wide range of skills required in TEAM 1 as such students should not expect to cover everything in one go. The format will, where ever possible, follow the order of exercises as you would find them in the TEAM Test. Gold students - you have the option to work on whichever skill(s) you wish from the current or previous posted weeks, Please do not ask or post on lectures/exercises that have not yet been released. The syllabus listed below may be adjusted prior to the start of class.
SKILLS:
1: Engagement 'n Play, Pivots, Fly Around
2: Position changes (close up 'n far away)
3: Front, Jump, Back-up
4: Vertical target, Stays
5: Auto leave it, Scent articles
6: Troubleshooting before testing
LECTURES:
- Equipment
- Human Be Still - Be Consistent
- Heel Position
- Where you place your reward matters
- Know your job before you add the dog
- Are you ready to test? Know the rules & criteria
Prerequisites & Supplies
PRE-REQUISITES:
No experience is necessary to start. This is a foundation-level class and, therefore, an introduction to the steps for each skill/exercise required in Team 1 Levels and virtual video title submissions.
Any equipment you will need will depend on which skill/exercise you wish to tackle, the level you and your dog are currently working and what you wish to focus on. If you are seeking to work in a specific obedience genre you may want to consider integrating the same equipment you will eventually be using to trial.
Below is a short list of equipment you'll need. A more detailed equipment list will be available in the course material but this list should help to get you started in your collection prior to beginning class:
-
Clicker (if you use one)
-
Target (vertical touch target & foot target)
-
Cone or Jump stanchion (vertical object go around)
-
Platform (rectangular approx. 4" high, slightly wider than the dog & long enough for dog to comfortably stand and/or down on)
-
Pivot or Perch Pot (i.e. large bowls, phone book (taped))
-
Scent Articles - any type (obedience articles, canning rings, metal tins, or any other type of small container and odour if you use it.
-
Jump (preferably adjustable, can be any type of jump as long as it meets criteria of height & width of TEAM)
-
Mirror is handy to check your positioning (long one - if you have one available for viewing human/dog position)
Sample Lecture
FLY AWAY - Going Out & Around A Cone (obstacle)
Exercise: On cue, dog goes out and away from handler and circles the obstacle and returns to the handler. This exercise is not only the beginning stages of teaching your dog it's OK to work away from you, its also a great, fun way to relieve training pressures and insert some energy or fun games into your training session. We usually work so hard on keeping our dogs focused on, and connected with us, that for some dogs being sent "away" can be quite daunting. If you have already played with some target training either close up or distance the fly should be a fairly easy transition for your dog.
So what does this Fly actually do for you?
1) In traditional obedience, it can be applicable to the Go-out send for the Directed Jumping or the Directed Retrieve (3 gloves). Within the more advanced levels of TEAM, for instance, Level 5, you can substitute 3 cones or poles to act as a replacement for the 3 gloves while you work through the direction & energy of the send away. When you have achieved the desired direction and energy, adding the gloves as part of the retrieve portion becomes a fairly easy introduction.
2) Great way to introduce jump stanchions
3) Option for encouraging straight jump & distance on the broad jump
4) Send a fly to relieve pressure or inject energy in an exercise (i.e. heeling, fly, re-connect heeling)
5) Re-setting your dog for another attempt at an exercise
6) Allows you to work on components of an exercise without worrying about other criteria of that exercise.
My own preference for equipment in this exercise is a large traffic cone, mainly because they are heavier & taller so less likely to be knocked over by my dog's body or feet, but any upright object will work. You can use a jump stanchion, a garbage can, post in the ground, stool or one of those mesh collapsible laundry buckets or leaf collection buckets. Heck, you could even use a tree or telephone pole but the problem is moving it to a new location.
I like to teach the dogs to go both directions - variety/versatility is fun after all and is a big help if you're thinking about agility or other sports that require multi-directional sends. This also keeps the dog flexible and balanced. All dogs have a dominant directional preference that they find easier to complete. Teaching them to go both ways helps to keep them balanced. I will also typically use both arms to indicate direction. The cue you use is your choice - I have opted for a verbal FLY with using an extended arm on the side I'd like the dog to approach the obstacle from. For instance, left arm sends the dog (as they're facing the cone) to the right (clockwise) around the cone and my right arm would send the dog to their left (counter clockwise) around the cone. If I want to get really fancy, I can also the add direction my torso/arm are pointing i.e. dog on my right, right arm and torso point in the direction for the dog to go clockwise around.
Starting your FLY: Your options, of course, are to shape, which can be fun, lure or bits of both shaping and luring. Luring requires that you initially keep your hand lower (where your dog naturally placed their head just standing) as you take the dog around the cone. Holding your hand higher means there's less connection to the obstacle and you may find the dog tripping over the cone more than going around it because they're totally focused on just the hand/reward and where it's going. If I'm luring the dog who is on my left side already, I'll use my right hand to nose lure them around clockwise and vice versa going counter clockwise. Remember you'll want an obstacle that you can reach around easily as you move the dog with the lure. Once they've got the idea you can switch it up to other types of obstacles.
Here I'm doing just doing some armchair training with Piper, clicking for any interaction with the Cone in any manner. This helps to create value in the cone. Notice how I can create direction by where I throw or give the treat. I can get variety in approach for later on. Even in this video, she is developing a directional approach preference.
In this video, I played armchair training again to create value for the cone.
This video shows the first session of Piper learning to leave me to go around the cone. Her shaping prepped her for going around. At one point you'll see me not Click because I was wanting an additional step rather than constantly clicking at the same point. This caused a bit of confusion for Piper.
Here I begin adding the verbal cue & hand signal but Piper was distracted & sirens happened. But you can see how I turned her before sending and also waited for her to look at me before sending her.
An option to create even more value for the cone while also creating variety is to train multiple circles around the cone. This can be achieved either by shaping (changing where you mark/reward) as well as taking advantage of your reward placement; both to encourage an additional circle or set-up to perform the next send around. For multiple circles: if your dog is going clockwise as he starts to wrap the cone mark and then use the lure in your left hand and draw the dog around and to the 9 o'clock position before you reward. This puts your dog in the position to continue the next wrap where you can mark at the 3 o'clock position and then place the lure with your left hand to draw the dog again to the 9 o'clock position.
Get ready for next send around: as the dog goes around cone mark and as he returns to you, draw the dog past you and turn them so they are again facing the cone and release the reward. This can be done if you're sending either clockwise or counterclockwise. It's an easy way to achieve set-ups for alternating between clockwise and counterclockwise one after the other.
****
Adding distance and Return energy
So far we've been working fairly close to the cone but eventually, we want to create a nice distance send as well as a quick return to the handler. Return to the handler is good to start from the beginning because there can be instances when working the fly, that your dog will get stuck on staying by the obstacle when you mark waiting for the reward to come to them. Only when your dog has grasped the idea that his job is to go out and around the cone will we add greater distance or introduce handler movement to create energy. If we introduce handler movement too soon, such as a chase game, we run the risk of the dog backing out of the send around the cone to chase you instead.
Creating Distance: You will gradually take small half steps back from where you send the dog to the cone. I stress small half type steps, not giant steps backwards.
1) Set the dog up facing the cone and send.
2) As the dog commits to circle the cone, mark and step back one step, as the dog is coming towards you for the reward.
3) Repeat 2-3 times at this distance, then move again, gradually increasing the distance away from the cone. For TEAM Level 1 that distance is minimum of 5 ft. I like to always opt for a bit more than I really need as you'll eventually require more than the 5ft distance for other competition or team exercises.
*** In the video above, I discretely add distance by taking a step backwards either as Tag's back is facing me or as I throw the treat past myself.
Injecting return energy: Here we're going to use handler movement to create energy on the return after circle to handler. Initially it is best to stand still as you send your dog. The reason - we don't want the dog to cue off of and be reliant on motion from you. So don't look like you're sending and then about to race off.
1) Send the dog to circle the cone
2) Wait until the dog is committed to circling the cone, mark it
3) Take off running away from your dog by either:
- turning and running straight away from the cone
- turning to left or right (depending on direction of send) and run away
NOTE: if you're sending the dog to go clockwise from the left, you would take off running after they have committed to the left, this encourages a tight wrap
Here I'm adding a bit of movement to encourage faster return from Piper
Using the cone to encourage the dog to stride out after a jump & at the same time encourage a tight return.
Here I use the cone for a bar jump send; stride out and tight return.
Motion added by the handler injects fun and capitalizes on the chase instinct our dogs have. The direction you run can sharpen your turns, keeping them tight to the cone, which helps keep the dog from going wide as they make any type of turn. So change up which direction you get your dog to chase you - variety keeps them focused.
Keep in mind that many of the regular obedience exercises which incorporate a send, require you to be still on the send. So if you've added a forward step motion to your send, you will eventually want to also teach the dog to be sent away WITHOUT your forward movement. Using the chase after send helps in this area. Again change it up - keep the dog guessing as to what you're going to do next.
Keep building the distance you are able to send your dog, either with handler motion as you send (think heeling then fly then back to heeling or jump then back to the handler) or handler being stationary as you send.
OTHER SPORTS NOTES: If you're competing in other dogs sports that require directional cues keep in mind the exercises that may be similar in nature. You'll find it advantageous to keep your hand cues consistent between sports not only for precision but because it can be less frustrating for your dog. Agility is one sport that comes to mind that has a tonne of directional cues that rely on both body turns & directional arms. Considering this from the start helps you clean up your cues for both sports.
Testimonials & Reviews
A sampling of what prior students have said about this course ...
Oh, too much fun! This was my first Gold and you totally nailed it for me. I felt a little bad that I wasn't as detailed as some folks when I posted videos. Since I'm not a "competition person"--sometimes I felt like I didn't even know enough to know what I should be asking about, so I just sorta hurled video at you and said "Huh? What now?" But I loved the feedback I got--always plenty to work on, but not so much that it freaked me out or I got overwhelmed. That's a lot of behaviors to cover, and I thought you broke it down beautifully. Thank you for making my first Gold a success!
Thank you for your attention to detail in presenting the course materials as well as individual feedback, and the enthusiasm you have for student progress.
Loved her clear, relatively concise lectures (and short videos) that explained exercises from the ground up (like what is Marking, and why do we teach it, what are its applications?), and at the end Heather provided a section on the Final Picture. Super helpful to include this basic information so the student understands why she's doing a particular step, where it's leading, and the final goal. Heather is an excellent teacher.
I enjoyed the class and particularly liked the very detailed feedback I got from you. You came up with a lot of little tweaks to my training technique, which I could definitely use.
I love Heather's teaching style. I learned a lot. thanks Heather!
Team is such a fantastic program! Thanks FDSA for providing such great instructors to help work through the starting levels. There is soooo much to learn and this class really helps.
I like the online idea as I can go over it several times. The course was very useful and covered the topic really well. Good product. Jess L
Registration
There are no scheduled sessions for this class at this time. We update our schedule frequently, so please subscribe to our mailing list for notifications.
Registration opens at 11:30am Pacific Time.
SILVER LEVEL Testing Project for April 2026 - In this session students will be permitted to submit ONE 90 second video per week when registered at the silver level. All "your dog" specific questions must be accompanied by video so the instructor can assess video and questions together. Silver students may also ask generic questions and participate in discussion forum threads.
TR101 Subscriptions
Gold
Silver
Bronze
Tuition
$
260.00
$
130.00
$
65.00
Enrollment Limits
12
25
Unlimited
Access all course lectures and materials
✔
✔
✔
Access to discussion and homework forums
✔
✔
✔
Read all posted questions and answers
✔
✔
✔
Watch all posted videos
✔
✔
✔
Post general questions to Discussion forum
✔
✔
✖
Submit written assignments
✔
✖
✖
Post dog specific questions
✔
With video only
✖
Post videos
✔
Up to 2
✖
Receive instructor feedback on
- Questions
- All videos
- Questions
- All videos
✖
Find more details, refund policies and answers to common questions in the Help center.
TR101 Subscriptions
Gold |
Silver |
Bronze |
|
|---|---|---|---|
| Tuition | $ 260.00 | $ 130.00 | $ 65.00 |
| Enrollment Limits | 12 | 25 | Unlimited |
| Access all course lectures and materials | ✔ | ✔ | ✔ |
| Access to discussion and homework forums | ✔ | ✔ | ✔ |
| Read all posted questions and answers | ✔ | ✔ | ✔ |
| Watch all posted videos | ✔ | ✔ | ✔ |
| Post general questions to Discussion forum | ✔ | ✔ | ✖ |
| Submit written assignments | ✔ | ✖ | ✖ |
| Post dog specific questions | ✔ | With video only | ✖ |
| Post videos | ✔ | Up to 2 | ✖ |
| Receive instructor feedback on |
|
|
✖ |
Find more details, refund policies and answers to common questions in the Help center.
Course Details
This class continues on with the foundations begun in TEAM 1! This class is designed to cover all the exercises in the TEAM Level 2. The TEAM program systematically lays out the building blocks for developing solid skills/behaviours your dog can perform in a variety of ways, in a variety of circumstances or sports.
The skill areas assessed in the TEAM course include but are not limited to; Engagement & Focus To Work, Heeling, Fronts & Finishes, Distance Work, Targeting, Jumping, Scent Work (Articles) and Impulse Control. The exercises are broken down into progressive steps to accommodate all levels! Introducing the core basics right from the start helps to make sure that the journey of obedience remains fun for both your dog and you, the handler!
Whether you are new to competitive obedience training or you have discovered a need to revisit skills with advanced dogs, this course will help you prepare to title by video under the TEAM banner or alternatively, simply give you an excellent set of foundation skills for any dog sport or competition venues such as AKC, CKC or FCI obedience, Rally or even Freestyle.
For more information on the TEAM titling program, please visit Fenzi Team Titles Website
Teaching Approach
Lectures will be released at the start of each week with the majority of lectures released within the first 4 weeks. Lectures are generally broken down by skill which often consists of multiple steps. Descriptions of the exercise as per TEAM are detailed followed by written instructions and multiple video examples for each step as needed. Lecture demo videos may range between 25 seconds - 2 minutes in length. No voiceover is used however, there may be occasional subtitles/text in the videos. Homework is given at the end of each lecture or a "show me your baseline current status" whereby students will post where they are in a specific exercise.
Videos will usually depict training done with the handler standing. For viewing of mechanics or handler requirements exercises can be modified by either the handler sitting on the ground or in some instances raising the dog by utilizing a platform to assist with a better view or mechanics.
Instructor: Lucy NewtonLucy Newton (she/her) has been training dogs and teaching dog training almost all her adult life. She was a search & rescue dog trainer, handler, and instructor and trained numerous personal dogs for wilderness search and rescue, as well as land and water human remains detection. Working with very active wilderness SAR teams, she worked on a large number of missing person cases in both urban and very remote wilderness locations. (Click here for full bio and to view Lucy's upcoming courses)
Syllabus
Due to the wide range of skills students are not expected to master all 10 of the TEAM 2 Exercises and roughly 15 skills. Approximately 3 skills per week will be introduced. Gold students will have the option of working on any of the skills discussed from the current or previous weeks. It is the goal to release all lectures in the first 4 weeks in order to give students enough time to focus on their desired areas.
The planned order of release is as follows but may be adjusted (as per the TEAM 2 exercise order)
The following skills will be:
- Moving Engagement/Personal Play
- Pivoting Skills: Fading the perch, left & right pivots 360 degrees
- Finishes: 3 styles of finishes, fading props, proofing heel position
- Fronts: Fading props
- Position Changes (sit, down, stand)
> Working in heel position, Building Duration, Building Distance, Adding Distractions
- Mark: Teaching a cued look ahead to target (including watch & look away)
- Jumping: Teaching the broad or high jump (stationary handler)
- Retrieve: Beginning steps to picking up & delivery to hand
- Scent articles: Fading food lure & adding retrieve
Tentative Release For Session: (subject to change)
Week 1: Pivoting left & right in heel; 360 degrees, Position changes; heel position w/pauses), Mark
Week 2: Retrieve, Fronts, Position Changes (distance & distractions)
Week 3: Scent articles, Finishes, Engagement/Play
Week 4: Stays, Jumping
Students may pick which exercises they wish to work on each from any of the topics where a lecture has been released. Students will not likely be able to master all 10 exercises within the 6 weeks and should focus on topics they need the most guidance or instruction on.
Prerequisites & Supplies
Students do not need to have passed TEAM 1 (OB130) to participate in this class but should have a solid start on any of the behaviours listed in TEAM 2 that they wish to work on.
You do not need a large space to work as the majority of the exercises can be practiced in a space the size of a standard living room. We will break down the exercises into smaller manageable pieces so a large space is not necessary. However, if you have a dog who is close to the final product and wish to begin chaining exercises together, having access to a larger space 20 x 20, can offer you the room to practice without impediment and meet the required distance criteria for exercises.
Equipment Needed:
- Target/Platform (gate, jump stanchion, flat target or platform)
- Retrieve Item (either dumbbell or other object)
- Jump of any type (bar or broad jump)
- Scent Articles (4 identical objects i.e. can be dumbbell style or Nose Work containers)
Sample Lecture
LEFT & RIGHT FINISHES (otherwise known as Around or Swing Finishes)
Depending upon where you hail from there may be more than these two "official" finishes; usually, a come to heel from the front going either left or right. However, I'm going to be dealing with two that are the most common.
Firstly we have the left finish - often referred to as the Swing or Get Back; this has the dog going to the left of the handler swinging their rear to end up in heel position. The right finish, often called an Around Finish, has the dog going clockwise around the handler to end up in heel on the left. In most sports, the final heel position ends with the dog in a sitting position.
(Note: TEAM Titles does allow the handler to choose a default stand if it is noted on the video test submission and the dog remains consistent in either stand or sit within the exercise).
Right Finish: Around (dog goes around clockwise and into left heel position)
You can start with the dog in any position in front of you but standing position does make it easier to entice the dog to move and is the position I begin with. Being correctly or squarely in front doesn't matter at this point of the learning phase.
You have the option of using a lure or if your dog has a target to hand, using the hand. With a cookie in your right hand, put it to the dog's nose like a magnet and draw your right hand (with dog) backwards behind your back and encourage the dog to follow it, as the travels around behind you, transfer the cookie over to your left hand and finish bringing the dog around and up to heel. Remember to initially hold your right hand behind your back until after you have caught the dog with the left-hand cookie. If you drop your right hand too soon, your dog may follow it back and not continue around your body. As the dog starts to understand that there will be that transfer cookie, you can start to drop your right hand back beside your body.
Here's PiPER's 1st session of go around. Notice that my hands are high on the treat transfer, this helps to keep Piper's head up high as she goes around. Nothing formal yet.
">
Here you'll see Piper getting more comfortable going around and I'm starting to use my right hand as more of a signal.
As the dog progresses, use your right hand only to signal the finish and keep the cookie in your left hand. You can still bring your left hand behind your back as needed to help the dog come up to heel. However, you will want to release the treat in heel position.
The biggest problem with this finish is the dog's tendency to keep rotating and end up with their butt too far out and angled. Another problem is a slow go around which occurs when the sit in heel portion of the finish is added too quickly. The sit should be the last piece added.
For the butt out you can use your pocket hand or reward hand to catch the dog's nose and stop them nice and close to your body and rotate the head ever so slightly to the left as they come parallel either in a stand or sit.
When your dog is comfortable with the action of going around, you can insert the use of a platform in heel position to help assist in teaching the dog the concept of sitting/standing straight after going around behind you. Then gradually reduce the use of the platform/target.
This is the finished picture on Tag's Around Finish. Notice that I feed his head straight. If I were to feed at an angle closer to the center of my body, it would draw his front end forward to the right and cause his rear to swing out.
Left Finish: Swing, Set-up or Get In
This is where our work on pivot in heel carries over, and flows naturally into a left finish. If you have been doing the find heel exercises with the pivot pot then you've already been working on this skill and it won't take much to perfect! In the pivot the dog more or less, plants their front feet in heel and swings their rear around straight and then sits. I like the swing, especially if you have a "social" dog who likes to see or get distracted by what's going on around them i.e. that child standing there with the ice cream at nose level. The reason it works so nicely is that the head doesn't disappear very far past your body to gawk, just the dog's body swivels.
This is TAG's swing finish a couple of years ago, you can see he moves quite easily into heel and is quite precise. Again I feed with head straight out.
TAG doing his version of the swing now. He has a bit of difficulty due to a muscle issue with his right rear leg that doesn't allow him to be as precise in his final placement but that's okay.
">
This is OLLIE doing his version of a swing or get-in from the side. He was very quick so I've done it in slo-mo so you could see. Yes, he's a bit over-rotated but that's okay and due to his enthusiasm with the get-in game.
Another alternative is the left "C or U" finish. This can be done either using a target hand or a lure. To start you're going to do what I call the T' Da move or the "this way please". Start with feet together, the dog standing in front. Place lure magnet on the dog's nose, step back with your left leg and turn so your body basically now opens sideways to the left. Your left hand with dog attached will swing out in a slight arch (C) AND back far enough that your dog will have enough room to fully turn and be on a relatively straight course when coming back up into heel. Once the dog has begun to turn, you step forward with your left foot so your feet are together as you draw the dog up into heel. NO SITS required at this time. This is just about teaching position for the dog. Once you get position and speed, the sit is easily put into place.
Depending on your dog you may find it advantageous to break this skill down even further into two pieces:
1) just getting the dog to move past you AND 2) then adding the turn around to come back into heel. The treat is given at the farthest point of 1) and then when you add the turnaround the treat is then given at 2) when their head is in heel.
While you are initially teaching the "C" or "U" turn, you continue stepping back with your left leg or you may find your dog not going far enough back. Treating at the back turn can also help to drive the dog back farther so they have enough room to turn. Once your dog is nicely doing your left finish you can then delete the stepping back with your left leg and your cue will just be your left hand.
Piper learning the U Finish - My preference will be for her to use more of a pivot swing as that keeps her head from wandering. This would be where she basically plants her front feet as she pivots into heel facing forward.
Breaking down the C or U finish into two pieces
Go Through Finish - Alternative (think twice about this one)
I don't normally use this as a regular finish but for those who would like to know how to do it or start, I'm happy to accommodate. The reason, I personally don't teach the Go Thru Finish, is that I use going thru my legs mainly for working straight fronts and I also have a "Place" position of dog facing front from the rear through my legs that I use for energy pullbacks & sends. I'll also use the forward thru as a tight turn and come up to heel. The Go Thru Finish is definitely a fun exercise to play with to develop a tight heel or energize your dog between exercises as it's basically a just leg weave with a tight close sit. BUT if your dog is inclined to sit butt out, it can exacerbate this so you may initially have to use your reward to strategically feed the dog so the butt is corrected inwards.
If you decide to tackle this finish from the front remember that some dogs will initially be reluctant or even quite nervous about going through your legs. It's best to start with your legs as wide as possible, with dog immediately in front or behind you, you can either lure or just toss a cookie back and forth through your legs. If tossing the cookie don't throw it too far or your dog may initially just deek around your legs. In the "go thru legs" learning stage there is no asking the dog to come to heel, it's just straight back and forth thru your legs from up close and then farther away.
Once the dog is comfortable going through your legs, begin to strategically drop or toss the treat so it lands more to your rear left side. As you do this drop your left hand down and slightly back behind your left leg. The straighter you can drop your hand down the easier it can be to catch your dog's attention and lure the dog tight to heel by following the arm up into heel position. You can also add your pivot pot to heel position as an additional help cue to the dog.
Here are some video examples of Piper and Tag coming into "PLACE". Plus a couple of Thru & Come To Left Heel. I have to be careful with TAG because as you can see I'm not tall enough for him to fit comfortably thru my legs and I can get tossed over easily. Piper is learning to sit straight on left.
TAG
Piper - As you can see Piper loves her Place cue and is much smaller than Tag so fits nicely between my legs.
Testimonials & Reviews
A sampling of what prior students have said about this course...
I thoroughly enjoyed learning under Heather's coaching. She breaks things down and explains why things work so it is easier to understand. And she knows that all dogs are not the same and adjusts her instructions accordingly.
Great job at teaching the course, I plan to revisit the lectures in the future and hope to get more out of it at that time!! thought that you were great in explaining and as well as commenting on the gold students videos so that everyone could get valuable information from it no matter what level they were taking the course at. Thank you so much for your time and effort to this course!
Heather provided very detailed, custom feedback to all of her students in this class. She really went above and beyond to review and analyze my videos. I really appreciate that!
Heather is an awesome instructor. She takes so much time crafting responses that there is little room for confusion.
Fantastic course with an excellent instructor. Heather has some wonderful ideas to help the dogs be successful and makes teaching the TEAM skills super fun. This was our first class with Heather at Gold, but it won't be our last.
Thank you! Such detailed info for the golds!
This was my first course with the Fenzi Academy and it certainly will not be my last!! What a great experience and wonderful people and teacher!! So happy that i found such a wonderful place to get information so that I can grow with my wonderful pup!
Registration
There are no scheduled sessions for this class at this time. We update our schedule frequently, so please subscribe to our mailing list for notifications.
Registration opens at 11:30am Pacific Time.
This class will run as a self-study session for the February 2026 session. All lectures will be released but there will not be any classroom forums or instructor interactions.
TR101 Subscriptions
Bronze |
||
|---|---|---|
| Tuition | $ 50.00 | |
| Enrollment Limits | Unlimited | |
| Access all course lectures and materials | ✔ | ✔ |
Find more details, refund policies and answers to common questions in the Help center.